23 min to read
KVM and Cockpit Complete Virtualization Setup Guide
Build modern virtualization environments with KVM hypervisor and Cockpit web management
Overview
In modern IT environments, virtualization technology has become essential for efficient server resource utilization and operational cost reduction.
KVM (Kernel-based Virtual Machine) is widely used in Linux environments as a hypervisor that provides high performance and stability.
This comprehensive guide demonstrates how to install KVM on Ubuntu/Debian-based systems and build an intuitive virtual machine management environment using Cockpit, a web-based management tool.
With Cockpit, you can easily create, manage, and monitor virtual machines through a browser interface without complex command-line operations.
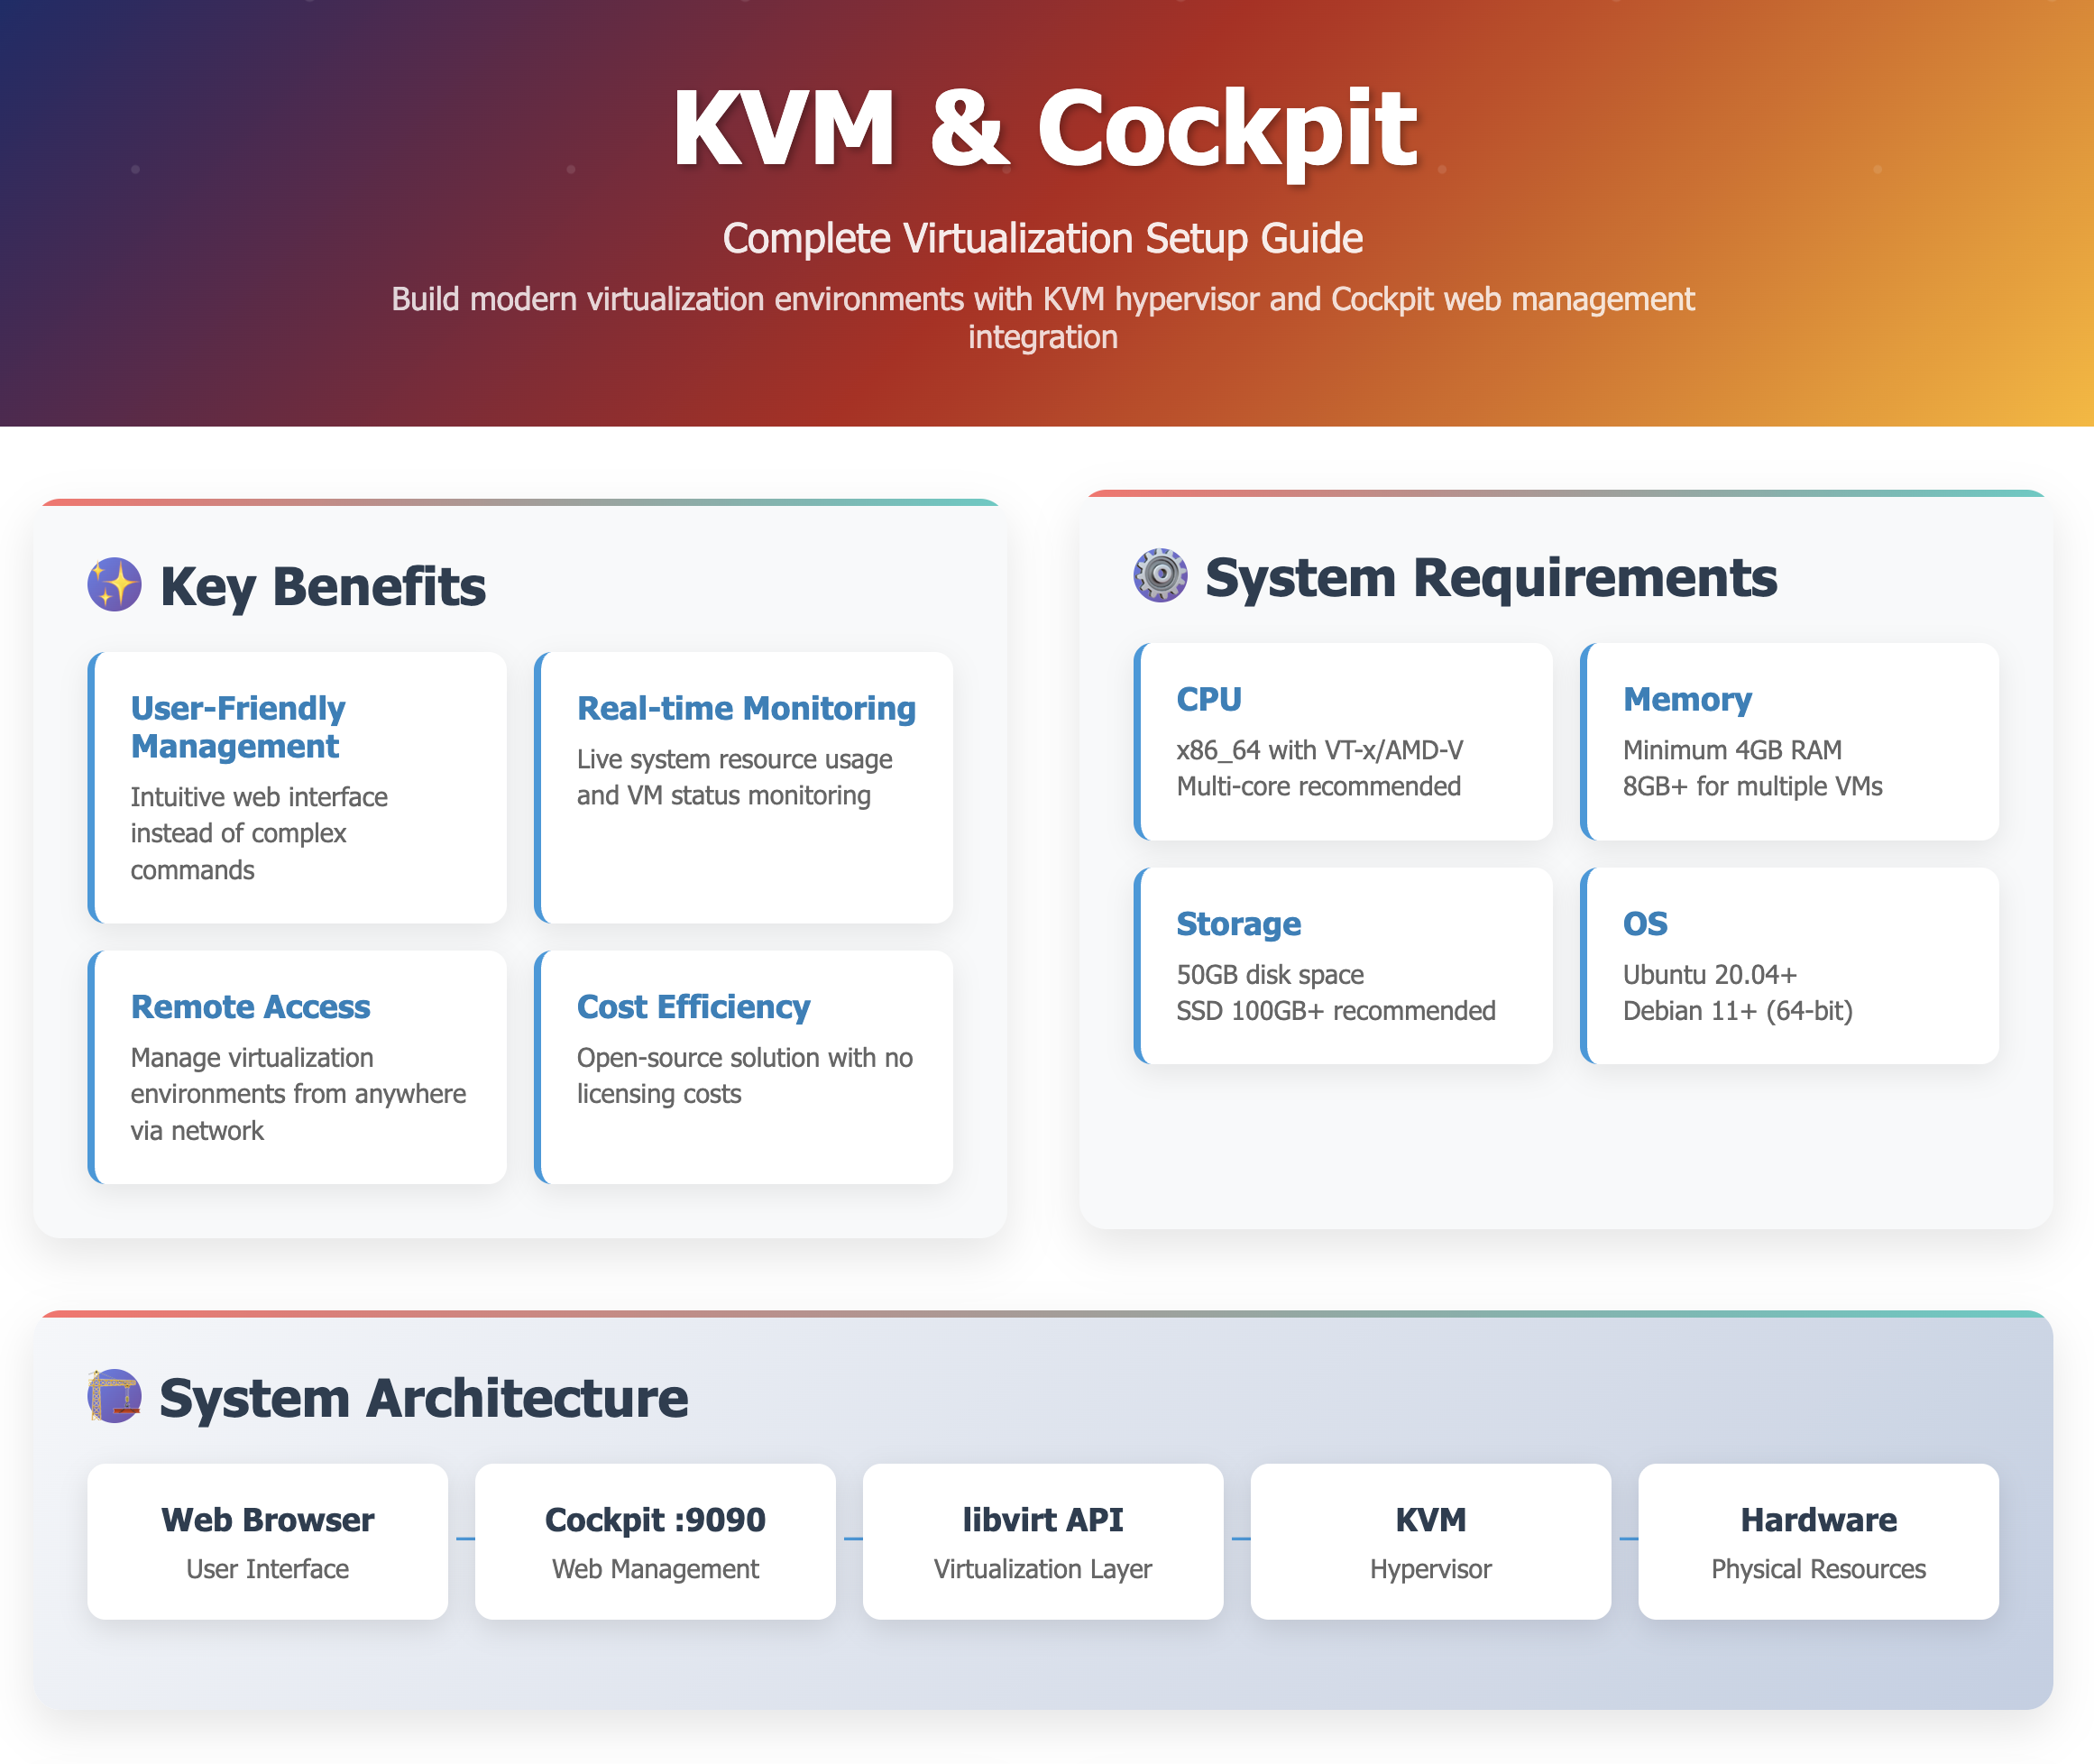
Key Benefits of KVM + Cockpit
- User-Friendly Management: Intuitive web interface instead of complex commands
- Real-time Monitoring: Live system resource usage and VM status monitoring
- Remote Access: Manage virtualization environments from anywhere via network
- Cost Efficiency: Open-source solution with no licensing costs
System Architecture Overview
Understanding the architecture helps optimize your virtualization setup and troubleshoot issues effectively.
KVM and Cockpit Stack
Prerequisites and System Requirements
Before beginning the installation, ensure your system meets the necessary requirements.
Hardware Requirements
| Component | Minimum Requirements | Recommended |
|---|---|---|
| CPU | x86_64 with VT-x/AMD-V support | Multi-core CPU with hardware virtualization |
| Memory | 4 GB RAM | 8+ GB RAM for multiple VMs |
| Storage | 50 GB available disk space | SSD with 100+ GB for optimal performance |
| Network | Single network interface | Multiple NICs for advanced networking |
Software Requirements
| Software | Requirements |
|---|---|
| Operating System | Ubuntu 20.04+ or Debian 11+ (64-bit) |
| Kernel | Linux kernel 4.15+ with KVM support |
| User Privileges | sudo access for installation and configuration |
| Network Access | Internet connection for package downloads |
Step 1: System Preparation and Updates
Begin with essential system preparation to ensure a clean installation environment.
Update Package Repository
# Update package lists to get latest software information
sudo apt update

# Upgrade existing packages to latest versions (optional but recommended)
sudo apt upgrade -y

# Install essential build tools and dependencies
sudo apt install -y curl wget gpg software-properties-common
Verify System Compatibility
# Check if CPU supports virtualization
grep -E '(vmx|svm)' /proc/cpuinfo

# Alternative check using egrep
egrep -c '(vmx|svm)' /proc/cpuinfo
# Should return a number > 0

# Check if virtualization is enabled in BIOS
sudo apt install -y cpu-checker
sudo kvm-ok
Expected output for successful virtualization support:
INFO: /dev/kvm exists
KVM acceleration can be used
Step 2: KVM Installation and Configuration
Install the complete KVM virtualization stack with all necessary components.
Install Core KVM Packages
Package Descriptions
| Package | Purpose |
|---|---|
| cpu-checker | Tool to check CPU virtualization support capabilities |
| qemu-kvm | Core KVM hypervisor package with QEMU backend |
| libvirt-daemon-system | System daemon for managing virtual machines |
| bridge-utils | Network bridge management utilities for VM networking |
| libguestfs-tools | Tools for manipulating virtual machine disk images |
| virt-manager | GUI-based virtual machine management tool |
| virtinst | Command-line tools for VM installation |
| virt-viewer | Virtual machine console viewer application |
Verify KVM Installation
Check KVM Module Loading
# Verify KVM modules are loaded
lsmod | grep kvm

# Expected output (Intel):
# kvm_intel             245760  0
# kvm                   663552  1 kvm_intel

# Expected output (AMD):
# kvm_amd               106496  0
# kvm                   663552  1 kvm_amd
Test KVM Functionality
# Comprehensive KVM support verification
sudo kvm-ok

# Check libvirt version and capabilities
sudo virsh version

# List available capabilities
sudo virsh capabilities | head -20
Verify Device Access
# Check KVM device permissions
ls -la /dev/kvm
# Should show: crw-rw---- 1 root kvm ... /dev/kvm

# Check current user groups
groups $USER
Step 3: Libvirt Service Configuration
Configure and optimize the libvirt service for stable VM management.
Start and Enable Libvirt Services
# Check current libvirt daemon status
sudo systemctl status libvirtd

# Start libvirt daemon if not running
sudo systemctl start libvirtd

# Enable libvirt to start automatically at boot
sudo systemctl enable libvirtd

# Start and enable additional libvirt services
sudo systemctl enable --now libvirt-guests
sudo systemctl enable --now virtlogd
Configure User Permissions
# Add current user to libvirt group for VM management
sudo usermod -a -G libvirt $USER
sudo usermod -a -G kvm $USER

# Add any additional users who need VM access
# sudo usermod -a -G libvirt username

# Apply group changes (logout/login required for full effect)
newgrp libvirt
Verify Service Configuration
# Check libvirt daemon status
sudo systemctl is-active libvirtd
sudo systemctl is-enabled libvirtd

# Test libvirt connectivity
virsh list --all

# Check default network status
virsh net-list --all
Configure Default Network
# Ensure default libvirt network is available
sudo virsh net-start default
sudo virsh net-autostart default

# Verify network configuration
sudo virsh net-dumpxml default

# Check network bridge status
ip addr show virbr0
Step 4: Cockpit Installation and Setup
Install Cockpit web management interface with virtualization capabilities.
Install Cockpit Packages
# Install Cockpit core and machines plugin
sudo apt install -y cockpit cockpit-machines

# Install additional useful Cockpit modules
sudo apt install -y cockpit-networkmanager cockpit-storaged cockpit-packagekit cockpit-system
Cockpit Components
| Component | Functionality |
|---|---|
| cockpit | Core web interface for system management |
| cockpit-machines | Virtual machine management plugin |
| cockpit-networkmanager | Network interface and configuration management |
| cockpit-storaged | Storage device and filesystem management |
| cockpit-packagekit | Software package management interface |
Start and Enable Cockpit Service
# Start Cockpit service
sudo systemctl start cockpit

# Enable Cockpit to start at boot
sudo systemctl enable cockpit

# Check Cockpit service status
sudo systemctl status cockpit

# Verify Cockpit is listening on port 9090
sudo ss -tulpn | grep :9090
Step 5: Security Configuration
Implement essential security measures for your Cockpit installation.
Configure User Access Control
Restrict Root Access
# Create or edit disallowed users file
sudo vi /etc/cockpit/disallowed-users

# Add the following content to disable root login:
root
Create Dedicated VM Management User (Optional)
# Create a dedicated user for VM management
sudo useradd -m -s /bin/bash vmadmin
sudo passwd vmadmin

# Add to necessary groups
sudo usermod -a -G libvirt,kvm vmadmin

# Create sudo privileges for VM management
sudo visudo

# Add this line:
# vmadmin ALL=(ALL) NOPASSWD: /usr/bin/virsh, /usr/bin/virt-install
Firewall Configuration
# Check if UFW firewall is active
sudo ufw status

# If UFW is active, allow Cockpit access
sudo ufw allow 9090/tcp

# For more restrictive access, allow only from specific networks
# sudo ufw allow from 192.168.1.0/24 to any port 9090

# Alternative: Configure iptables directly
# sudo iptables -I INPUT -p tcp --dport 9090 -j ACCEPT
SSL/TLS Configuration (Optional)
Enable HTTPS with Custom Certificate
Apply Security Settings
# Restart Cockpit service to apply security changes
sudo systemctl restart cockpit

# Verify Cockpit is running with new configuration
sudo systemctl status cockpit

# Check Cockpit logs for any issues
sudo journalctl -u cockpit -f
Step 6: Web Interface Access and Initial Setup
Access and configure Cockpit through its web interface.
Access Cockpit Web Interface
Connection Information
# Web interface URL
http://<server_IP>:9090
# or with HTTPS (if configured)
https://<server_IP>:9090

# Get server IP address
ip addr show | grep inet

# Alternative methods to find IP
hostname -I
First Login
- Open Web Browser: Navigate to
http://your-server-ip:9090 - Accept Certificate: For self-signed certificates, accept the security warning
- Login: Use your system user account credentials (not root)
- Enable Administrative Access: Check “Reuse my password for privileged tasks”
Initial Configuration
Dashboard Overview
After login, you’ll see the main dashboard with:
- System Information: CPU, memory, storage usage
- Services: System service status
- Logs: Recent system logs
- Network: Network interface status
Access Virtual Machines Section
- Navigate to Virtual Machines: Click on “Virtual Machines” in the left sidebar
- Install Extensions: If prompted, install the cockpit-machines package
- Verify Access: Ensure you can see the libvirt connection status
Step 7: Virtual Machine Creation and Management
Create and manage virtual machines through Cockpit’s intuitive interface.
Prepare VM Images
Download Cloud Images
# Create directory for VM images
sudo mkdir -p /var/lib/libvirt/images

# Download Ubuntu 22.04 (Jammy) Cloud Image
cd /tmp
wget https://cloud-images.ubuntu.com/jammy/current/jammy-server-cloudimg-amd64.img

# Download Ubuntu 24.04 (Noble) Cloud Image
wget https://cloud-images.ubuntu.com/noble/current/noble-server-cloudimg-amd64.img

# Move images to libvirt directory
sudo mv jammy-server-cloudimg-amd64.img /var/lib/libvirt/images/
sudo mv noble-server-cloudimg-amd64.img /var/lib/libvirt/images/

# Set appropriate permissions
sudo chown libvirt-qemu:kvm /var/lib/libvirt/images/*.img
sudo chmod 644 /var/lib/libvirt/images/*.img
Prepare Custom Images (Optional)
Create Virtual Machine via Cockpit
Step-by-Step VM Creation
- Access VM Creation:
- In Cockpit, go to “Virtual Machines”
- Click “Create VM” button
- VM Configuration:
- Name: Enter a descriptive name (e.g., “ubuntu-web-server”)
- Source: Select “Import existing disk image”
- Image: Browse to your cloud image file
- Memory: Allocate RAM (e.g., 2048 MB)
- vCPUs: Set number of virtual CPUs (e.g., 2)
- Network Configuration:
- Network: Select “Virtual network ‘default’: NAT”
- MAC: Leave auto-generated
- Storage Configuration:
- Bus type: VirtIO (recommended for performance)
- Cache: Default
Advanced VM Configuration
VM Management Operations
Basic VM Operations via Cockpit
- Start/Stop VMs: Use power buttons in VM list
- Console Access: Click “Console” to access VM desktop
- Resource Monitoring: View CPU, memory, disk usage
- Snapshots: Create and manage VM snapshots
- Clone VMs: Duplicate existing VMs
Command-Line VM Management
# List all VMs
virsh list --all

# Start VM
virsh start vm-name

# Stop VM gracefully
virsh shutdown vm-name

# Force stop VM
virsh destroy vm-name

# Get VM information
virsh dominfo vm-name

# Console access
virsh console vm-name

# Edit VM configuration
virsh edit vm-name
Step 8: Network Configuration and Troubleshooting
Configure advanced networking options and resolve common network issues.
Default Network Configuration
Verify Default Network
# Check default network status
virsh net-list --all

# Display default network configuration
virsh net-dumpxml default

# Check default network bridge
ip addr show virbr0

# View NAT rules
sudo iptables -t nat -L LIBVIRT_PRT -n
Default Network Details
| Configuration | Details |
|---|---|
| Network Name | default |
| Bridge Interface | virbr0 |
| IP Range | 192.168.122.0/24 (typically) |
| DHCP Range | 192.168.122.2 - 192.168.122.254 |
| Gateway | 192.168.122.1 |
Advanced Network Configuration
Create Custom Network
# Create custom network XML configuration
cat > /tmp/custom-network.xml << EOF
<network>
  <name>custom-net</name>
  <forward mode='nat'/>
  <bridge name='virbr1' stp='on' delay='0'/>
  <ip address='10.0.0.1' netmask='255.255.255.0'>
    <dhcp>
      <range start='10.0.0.10' end='10.0.0.100'/>
    </dhcp>
  </ip>
</network>
EOF

# Define and start custom network
virsh net-define /tmp/custom-network.xml
virsh net-start custom-net
virsh net-autostart custom-net
Bridged Network Configuration
# Create bridge network for direct host network access
cat > /tmp/bridge-network.xml << EOF
<network>
  <name>host-bridge</name>
  <forward mode="bridge"/>
  <bridge name="br0"/>
</network>
EOF

# Define bridge network
virsh net-define /tmp/bridge-network.xml
virsh net-start host-bridge
virsh net-autostart host-bridge
Common Network Troubleshooting
VM Network Connectivity Issues
# Check VM network interface configuration
virsh domiflist vm-name

# Verify network bridges
brctl show

# Check iptables rules
sudo iptables -L -n
sudo iptables -t nat -L -n

# Test connectivity from host to VM
ping 192.168.122.x  # Replace with VM IP

# Check libvirt network logs
sudo journalctl -u libvirtd | grep network
DNS Resolution Issues
# Check dnsmasq configuration (used by libvirt)
sudo systemctl status libvirt-guests

# Verify DNS forwarding
cat /var/lib/libvirt/dnsmasq/default.conf

# Test DNS resolution from VM
# (access VM console first)
nslookup google.com
Firewall Configuration
# Check if firewall is blocking VM traffic
sudo ufw status

# Allow VM network traffic
sudo ufw allow in on virbr0
sudo ufw allow out on virbr0

# For specific port forwarding
sudo iptables -t nat -A PREROUTING -p tcp --dport 8080 -j DNAT --to-destination 192.168.122.x:80
Performance Optimization and Best Practices
Optimize your KVM and Cockpit setup for maximum performance and reliability.
KVM Performance Tuning
CPU Optimization
# Enable CPU host-passthrough for better performance
virsh edit vm-name

# In VM XML configuration, change CPU mode:
# <cpu mode='host-passthrough' check='none'/>

# Enable CPU pinning for critical VMs
# <vcpu placement='static' cpuset='0-3'>4</vcpu>
# <cputune>
#   <vcpupin vcpu='0' cpuset='0'/>
#   <vcpupin vcpu='1' cpuset='1'/>
# </cputune>
Memory Optimization
# Configure memory ballooning
# Add to VM XML:
# <memballoon model='virtio'/>

# Enable hugepages for better memory performance
sudo sysctl vm.nr_hugepages=1024

# Make hugepages persistent
echo 'vm.nr_hugepages=1024' | sudo tee -a /etc/sysctl.conf

# Configure VM to use hugepages
# Add to VM XML:
# <memoryBacking>
#   <hugepages/>
# </memoryBacking>
Storage Performance
# Use virtio-scsi for better I/O performance
# In VM XML disk configuration:
# <disk type='file' device='disk'>
#   <driver name='qemu' type='qcow2' cache='writeback'/>
#   <source file='/var/lib/libvirt/images/vm.qcow2'/>
#   <target dev='sda' bus='scsi'/>
#   <address type='drive' controller='0' bus='0' target='0' unit='0'/>
# </disk>

# Convert RAW images to QCOW2 for better performance
sudo qemu-img convert -f raw -O qcow2 image.raw image.qcow2

# Optimize existing QCOW2 images
sudo qemu-img convert -f qcow2 -O qcow2 -o preallocation=metadata old.qcow2 new.qcow2
Cockpit Performance Optimization
System Resource Monitoring
# Monitor system performance
htop
iotop
nethogs

# Check Cockpit resource usage
systemctl status cockpit
ps aux | grep cockpit
Optimize Cockpit Configuration
# Configure Cockpit for better performance
sudo vi /etc/cockpit/cockpit.conf

# Add optimization settings:
[WebService]
MaxStartups = 3
LoginTimeout = 10

# Restart Cockpit to apply changes
sudo systemctl restart cockpit
Monitoring and Logging
System Monitoring Setup
# Install monitoring tools
sudo apt install -y htop iotop nethogs

# Monitor libvirt logs
sudo journalctl -u libvirtd -f

# Monitor Cockpit logs
sudo journalctl -u cockpit -f

# Check VM performance
virt-top
Log Management
# Configure log rotation for libvirt
sudo vi /etc/logrotate.d/libvirt

# Content:
/var/log/libvirt/*.log {
    daily
    missingok
    rotate 7
    compress
    notifempty
    create 644 root root
    postrotate
        systemctl reload libvirtd
    endscript
}

# Test log rotation
sudo logrotate -d /etc/logrotate.d/libvirt
Security Hardening and Best Practices
Implement comprehensive security measures for production environments.
System Security
SELinux/AppArmor Configuration
# Check SELinux status (RHEL/CentOS)
sestatus

# Configure libvirt SELinux settings
sudo setsebool -P virt_use_execmem 1

# Check AppArmor status (Ubuntu/Debian)
sudo apparmor_status | grep libvirt

# Configure AppArmor for libvirt
sudo aa-complain /usr/sbin/libvirtd
File Permissions and Ownership
# Ensure correct ownership of VM images
sudo chown -R libvirt-qemu:kvm /var/lib/libvirt/images/
sudo chmod -R 644 /var/lib/libvirt/images/

# Secure libvirt configuration files
sudo chmod 600 /etc/libvirt/libvirtd.conf
sudo chown root:root /etc/libvirt/libvirtd.conf
Network Security
Firewall Configuration
# Configure UFW for KVM and Cockpit
sudo ufw allow ssh
sudo ufw allow 9090/tcp
sudo ufw allow in on virbr0
sudo ufw allow out on virbr0

# Enable UFW
sudo ufw --force enable

# Check firewall status
sudo ufw status verbose
Network Isolation
# Create isolated network for sensitive VMs
cat > /tmp/isolated-network.xml << EOF
<network>
  <name>isolated</name>
  <bridge name='virbr2' stp='on' delay='0'/>
  <ip address='172.16.0.1' netmask='255.255.255.0'>
    <dhcp>
      <range start='172.16.0.10' end='172.16.0.100'/>
    </dhcp>
  </ip>
</network>
EOF

virsh net-define /tmp/isolated-network.xml
virsh net-start isolated
virsh net-autostart isolated
Authentication and Access Control
Multi-Factor Authentication (Optional)
# Install libpam-google-authenticator for 2FA
sudo apt install -y libpam-google-authenticator

# Configure PAM for Cockpit
sudo vi /etc/pam.d/cockpit

# Add before @include common-auth:
# auth required pam_google_authenticator.so
User Access Auditing
# Monitor Cockpit access logs
sudo journalctl -u cockpit | grep "Login"

# Monitor libvirt operations
sudo auditctl -w /var/log/libvirt/ -p wa -k libvirt_access

# Check audit logs
sudo ausearch -k libvirt_access
Backup and Disaster Recovery
Implement comprehensive backup strategies for your virtual infrastructure.
VM Backup Strategies
Automated VM Backups
#!/bin/bash
# VM backup script
BACKUP_DIR="/backup/vms"
DATE=$(date +%Y%m%d_%H%M%S)

# Create backup directory
mkdir -p $BACKUP_DIR

# Function to backup VM
backup_vm() {
    VM_NAME=$1
    echo "Backing up VM: $VM_NAME"

    # Create snapshot
    virsh snapshot-create-as $VM_NAME "backup_$DATE" --disk-only --atomic

    # Export VM configuration
    virsh dumpxml $VM_NAME > "$BACKUP_DIR/${VM_NAME}_config_$DATE.xml"

    # Copy disk images
    for DISK in $(virsh domblklist $VM_NAME | grep -v Target | awk '{print $2}' | grep -v '^$'); do
        if [ -f "$DISK" ]; then
            cp "$DISK" "$BACKUP_DIR/$(basename $DISK)_$DATE"
        fi
    done

    # Remove snapshot
    virsh snapshot-delete $VM_NAME "backup_$DATE" --metadata

    echo "Backup completed for $VM_NAME"
}

# Backup all running VMs
for VM in $(virsh list --name); do
    backup_vm $VM
done
Incremental Backups
System Configuration Backup
Troubleshooting Common Issues
Solutions for frequently encountered problems in KVM and Cockpit environments.
KVM-Specific Issues
VM Won’t Start
# Check VM configuration for errors
virsh edit vm-name

# Verify VM resources are available
virsh nodeinfo
free -h
df -h

# Check libvirt logs
sudo journalctl -u libvirtd | tail -20

# Test VM start with verbose output
virsh start vm-name --console
Performance Issues
# Check host resource usage
htop
iotop
iostat -x 1

# Monitor VM resource usage
virt-top

# Check VM disk I/O
virsh domblkstat vm-name

# Optimize VM configuration
virsh edit vm-name
# Enable virtio drivers, adjust memory/CPU allocation
Cockpit-Specific Issues
Web Interface Access Problems
# Check Cockpit service status
sudo systemctl status cockpit

# Verify port binding
sudo ss -tulpn | grep :9090

# Check firewall settings
sudo ufw status
sudo iptables -L -n | grep 9090

# Review Cockpit logs
sudo journalctl -u cockpit -f
Plugin Issues
# Reinstall cockpit-machines plugin
sudo apt remove cockpit-machines
sudo apt install cockpit-machines

# Clear browser cache and cookies
# Restart Cockpit service
sudo systemctl restart cockpit
Key Points
-
Complete Virtualization Stack
- KVM hypervisor with libvirt management layer
- Cockpit web interface for intuitive VM management
- Comprehensive networking and storage options
- Enterprise-grade security and monitoring capabilities -
Key Installation Components
- qemu-kvm: Core hypervisor with hardware acceleration
- libvirt-daemon-system: VM management and API layer
- cockpit-machines: Web-based virtualization management
- bridge-utils: Advanced network configuration tools -
Production Considerations
- Implement proper security hardening and access controls
- Configure automated backups and disaster recovery
- Monitor performance and optimize resource allocation
- Maintain regular system updates and security patches
Conclusion
KVM and Cockpit provide a powerful combination for modern virtualization environments, offering enterprise-grade performance with user-friendly management. This setup delivers the stability and performance of KVM hypervisor with the accessibility of web-based administration through Cockpit.
The integration of these technologies enables organizations to build scalable, secure, and manageable virtual infrastructure without the complexity and cost of proprietary solutions. From development environments to production deployments, this stack provides the flexibility and reliability needed for modern IT operations.
Key Implementation Benefits
- User-Friendly Management: Intuitive web interface eliminates complex command-line operations
- Cost Efficiency: Open-source solution with no licensing fees
- High Performance: Native KVM performance with hardware acceleration
- Scalability: Supports everything from single-node setups to multi-host environments
- Security: Comprehensive security features and access controls
Future Recommendations
As containerization and cloud-native technologies continue evolving, KVM and Cockpit remain relevant for traditional virtualization workloads and hybrid infrastructure scenarios. Consider integrating with container orchestration platforms and infrastructure-as-code tools for comprehensive environment management.
The combination of KVM’s proven stability with Cockpit’s modern management interface provides an excellent foundation for organizations transitioning to modern virtualization practices while maintaining operational simplicity.
References
- KVM Official Website
- libvirt Official Documentation
- Cockpit Project Homepage
- Ubuntu KVM Guide
- Red Hat Virtualization Guide
- QEMU Documentation
- libvirt Python API
- KVM Networking Guide
- libvirt Mailing Lists
- Cockpit GitHub Repository
- KVM Forum
- Stack Overflow KVM Tag
- virt-install Manual
- Cockpit Machines Plugin
- libguestfs Tools

Comments