11 min to read
Understanding SSH Tunneling
A comprehensive guide to SSH tunneling and port forwarding
Understanding SSH Tunneling
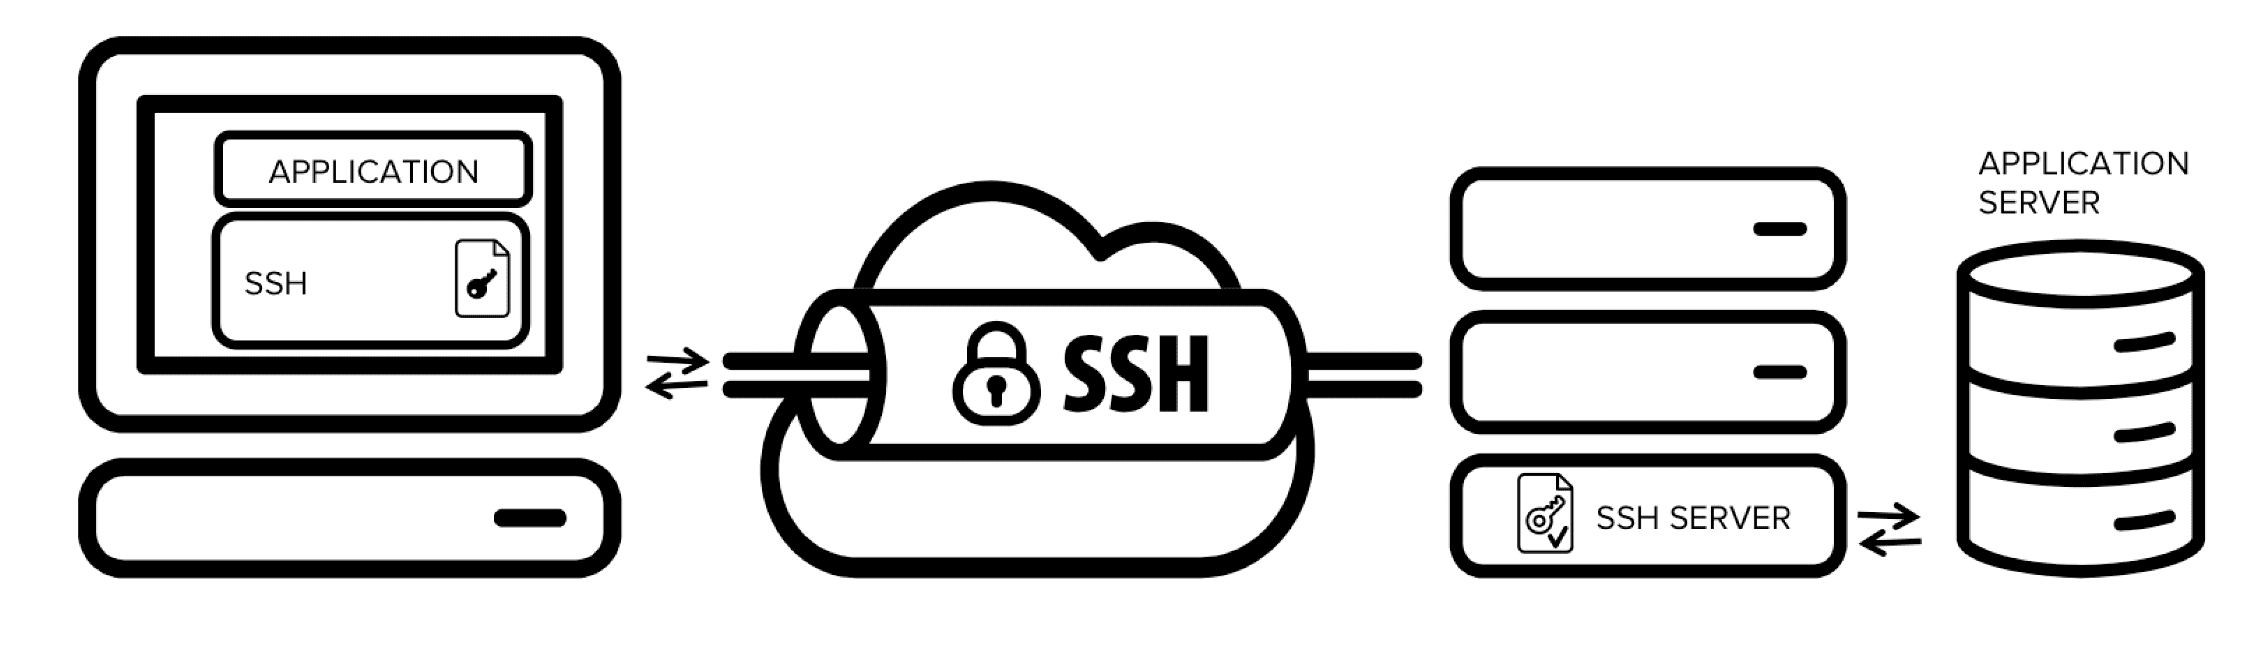
SSH tunneling is a powerful technique that enables the secure transmission of data through an encrypted connection. It allows users to create secure pathways between networks, bypass firewalls, and access restricted services. By leveraging the SSH protocol’s encryption capabilities, tunneling provides a secure method for transmitting sensitive information across potentially insecure networks.
What is SSH Tunneling?
The Evolution of Secure Network Access
SSH tunneling, also known as port forwarding, extends the functionality of the Secure Shell protocol beyond simple remote login capabilities:
- Encrypted Data Transfer: All traffic passing through an SSH tunnel is automatically encrypted.
- Network Barrier Bypass: Access services through firewalls that would otherwise block direct connections.
- Protocol Encapsulation: Wrap insecure protocol traffic inside the secure SSH protocol.
- Flexible Connectivity: Create versatile connection configurations for various networking scenarios.
SSH tunneling transforms SSH from a simple remote access tool into a comprehensive solution for secure network traversal.
| Feature | Benefit |
|---|---|
| Encryption |
|
| Versatility |
|
| Simplicity |
|
| Security |
|
SSH Tunneling Types and Mechanics
SSH tunneling comes in three primary varieties: local, remote, and dynamic forwarding. Each type serves different networking needs and provides unique capabilities for connecting systems securely across networks. Understanding the differences and appropriate use cases for each type is essential for effective implementation.
Types of SSH Tunneling
Local Port Forwarding
Connects a port on your local machine to a port on a remote server through an SSH connection.
- Syntax:
ssh -L local_port:target_host:target_port user@ssh_server - Example:
ssh -L 8080:internal-web:80 user@bastion-host - Use Case: Access an internal web server through a bastion host
Flow: Your application connects to a local port on your machine → SSH client forwards to SSH server → SSH server connects to target service
Remote Port Forwarding
Makes a service on your local machine accessible from a remote server.
- Syntax:
ssh -R remote_port:local_host:local_port user@ssh_server - Example:
ssh -R 8080:localhost:3000 user@public-server - Use Case: Expose a local development server to the internet
Flow: Remote clients connect to a port on the SSH server → SSH server forwards to SSH client → SSH client connects to local service
Dynamic Port Forwarding
Creates a SOCKS proxy server for dynamic application-level port forwarding.
- Syntax:
ssh -D local_port user@ssh_server - Example:
ssh -D 1080 user@jump-server - Use Case: Configure a browser to use the SSH server as a proxy
Flow: Applications connect to SOCKS proxy on local port → SSH client determines destination from SOCKS protocol → SSH server connects to various destinations
Practical Implementation Strategies
Implementing SSH tunnels in production environments requires consideration of stability, automation, and monitoring. While basic tunnels are simple to create, production-grade implementations typically involve additional components for persistence, recovery, and management.
Setting Up Persistent Tunnels
| Approach | Implementation | Considerations |
|---|---|---|
| systemd Service |
|
|
| autossh Utility |
|
|
| SSH Config Files |
|
|
Example: systemd Service Configuration
# /etc/systemd/system/db-tunnel.service
[Unit]
Description=Database SSH Tunnel
After=network.target

[Service]
User=tunnel-user
ExecStart=/usr/bin/ssh -N -L 3306:db-internal:3306 user@bastion-host
Restart=always
RestartSec=10
StartLimitIntervalSec=60
StartLimitBurst=5

[Install]
WantedBy=multi-user.target
Example: autossh Implementation
# Install autossh
sudo apt install autossh  # Debian/Ubuntu
sudo yum install autossh  # RHEL/CentOS

# Create tunnel script
cat <<EOF > /usr/local/bin/maintain-tunnel.sh
#!/bin/bash
export AUTOSSH_POLL=60
export AUTOSSH_PORT=0
export AUTOSSH_GATETIME=30
autossh -M 0 -o "ServerAliveInterval 30" -o "ServerAliveCountMax 3" -L 6379:redis-internal:6379 user@bastion-host -N
EOF

chmod +x /usr/local/bin/maintain-tunnel.sh
Example: SSH Config File
# ~/.ssh/config
Host bastion
    HostName bastion.example.com
    User tunnel-user
    IdentityFile ~/.ssh/tunnel_key
    LocalForward 3306 db-server:3306
    LocalForward 6379 redis-server:6379
    ServerAliveInterval 30
    ServerAliveCountMax 3
    ControlMaster auto
    ControlPath ~/.ssh/control-%h-%p-%r
    ControlPersist 1h
Advanced Configurations and Best Practices
Beyond basic setup, SSH tunneling can be enhanced with various configurations for improved security, performance, and reliability. These advanced practices help create robust tunnel implementations suitable for enterprise environments and critical applications.
Security Hardening
Security Considerations for SSH Tunnels
- Key-based Authentication: Eliminate password-based login in favor of SSH keys
- Dedicated Users: Create specific users for tunnel purposes with limited permissions
- Restricted Access: Configure bastions to allow only specific source IPs
- Host Verification: Always verify host keys to prevent MITM attacks
- Regular Key Rotation: Establish processes for periodic key updates
- Restricted Port Binding: Bind forwarded ports to localhost when possible
- Firewall Rules: Apply strict firewall rules on both client and server
Example: Restrictive sshd Configuration
# /etc/ssh/sshd_config
# Server-side restrictions
PermitRootLogin no
PasswordAuthentication no
AllowUsers tunnel-user
AllowTcpForwarding yes
GatewayPorts no
X11Forwarding no
PermitTunnel no
MaxSessions 10
ClientAliveInterval 60
ClientAliveCountMax 3
Performance Optimization
| Technique | Implementation |
|---|---|
| Compression |
ssh -C -L 3306:db:3306 user@hostAdd Compression yes to SSH configAdjust CompressionLevel 1-9 (higher = more CPU, better compression)
|
| Connection Sharing |
Host *
  ControlMaster auto
  ControlPath ~/.ssh/control-%h-%p-%r
  ControlPersist 1h
Reuses existing connections for multiple sessions |
| TCP Keepalives |
Host *
  TCPKeepAlive yes
  ServerAliveInterval 30
  ServerAliveCountMax 3
Prevents connections from being dropped by firewalls |
| Cipher Selection |
ssh -c aes128-gcm@openssh.com -L 8080:web:80 user@hostChoose faster ciphers for better performance (balance with security needs) |
Monitoring and Troubleshooting
Common Issues and Solutions
- Channel request failed: administratively prohibited
Solution: Check AllowTcpForwarding in sshd_config - Bind: Address already in use
Solution: Find and kill the process using the port:lsof -i :PORT - Connection closed by UNKNOWN
Solution: Implement keepalives:ServerAliveInterval 30 - Connection timed out during idle operation
Solution: Configure firewall timeouts or improve keepalives - High CPU usage
Solution: Adjust or disable compression if CPU-bound
Monitoring Script Example
#!/bin/bash
# tunnel-monitor.sh - Check and restore SSH tunnels

# Configuration
TUNNELS=(
  "3306:MySQL"
  "6379:Redis"
  "8080:WebApp"
)

# Check each tunnel
for tunnel in "${TUNNELS[@]}"; do
  port=$(echo $tunnel | cut -d: -f1)
  service=$(echo $tunnel | cut -d: -f2)

  # Check if port is listening
  if ! netstat -tuln | grep -q ":$port "; then
    echo "[$(date)] $service tunnel on port $port is DOWN - restarting"
    systemctl restart tunnel-$service.service
    # Notify administrators
    echo "Tunnel $service ($port) down, restarted" | mail -s "Tunnel Alert" admin@example.com
  else
    echo "[$(date)] $service tunnel on port $port is UP"
  fi
done
Real-World Implementation Examples
SSH tunneling solves many real-world networking challenges in enterprise environments. From database access to IoT device management, the following examples demonstrate practical applications of SSH tunneling for specific business needs.
Database Access Architecture
Example: Multi-Tier Database Access
# Connect to production and staging databases simultaneously
ssh -L 3306:prod-db.internal:3306 -L 3307:staging-db.internal:3306 user@bastion-host
Cloud to On-Premises Integration
Hybrid Cloud Connectivity
Using SSH tunnels for cloud to on-premises integrations:
- Data Synchronization: Secure channel for periodic data transfer
- API Integration: Connect cloud services to internal APIs
- Monitoring Access: Allow cloud monitoring to reach internal systems
- Hybrid Applications: Connect application components across environments
Using remote port forwarding, on-premises services can be securely exposed to cloud platforms without opening firewall ports or using public IPs.
Example: AWS to On-Premises Integration
# On your on-premises server
ssh -R 8080:internal-api:8080 -i aws_key.pem ec2-user@public-ec2-instance

# In AWS
curl http://localhost:8080/api/v1/data
IoT and Remote Device Access
# IoT maintenance tunnel
# Run on IoT device
ssh -R 2222:localhost:22 -R 8080:localhost:80 admin@management-server

# Access the device from management server
ssh -p 2222 localhost
Key Points
-
Core Types
- Local forwarding connects local ports to remote services
- Remote forwarding exposes local services to remote hosts
- Dynamic forwarding creates a SOCKS proxy for multiple applications
- All types leverage SSH's strong encryption and authentication -
Implementation Best Practices
- Use systemd services or autossh for persistent tunnels
- Implement key-based authentication only
- Configure proper monitoring and automatic recovery
- Restrict access with firewall rules and SSH configuration -
Business Applications
- Secure database access through bastion hosts
- Remote management of devices across networks
- Hybrid cloud integrations without VPN complexity
- Temporary access to services for maintenance and support

Comments