10 min to read
Building a Kubernetes Cluster with Kubespray (2026V.)
A complete guide to deploying Kubernetes v1.34 with Kubespray v2.30.0, Cilium CNI, and insecure registry configuration
Overview
There are several ways to build a Kubernetes cluster, but if you want repeatable and automated installations in an on-premises environment, Kubespray is one of the most powerful options.
Kubespray is an Ansible-based provisioning tool that allows flexible installation of Kubernetes clusters — including HA configurations — across various environments (GCP, AWS, on-premises, etc.) by simply defining YAML-based inventory files.
This guide covers the following key areas:
- Kubernetes v1.34 cluster deployment on Ubuntu 24.04 using Kubespray
- Cilium CNI, Helm, Metrics Server, and Krew addon configuration
- containerd insecure registry (Harbor) setup
- Worker Node addition (
scale.yml) and removal (remove-node.yml) - Real-world errors encountered during deployment and their solutions
System Configuration
Based on April 7, 2026 standards.
Environment Details
| Component | Specification |
|---|---|
| Operating System | Ubuntu 24.04 LTS |
| Kubernetes Version | v1.34.3 |
| Kubespray Version | v2.30.0 |
| CNI Plugin | Cilium v1.19.1 |
| Container Runtime | containerd v2.2.1 |
| Cluster DNS | somaz-cluster.local |
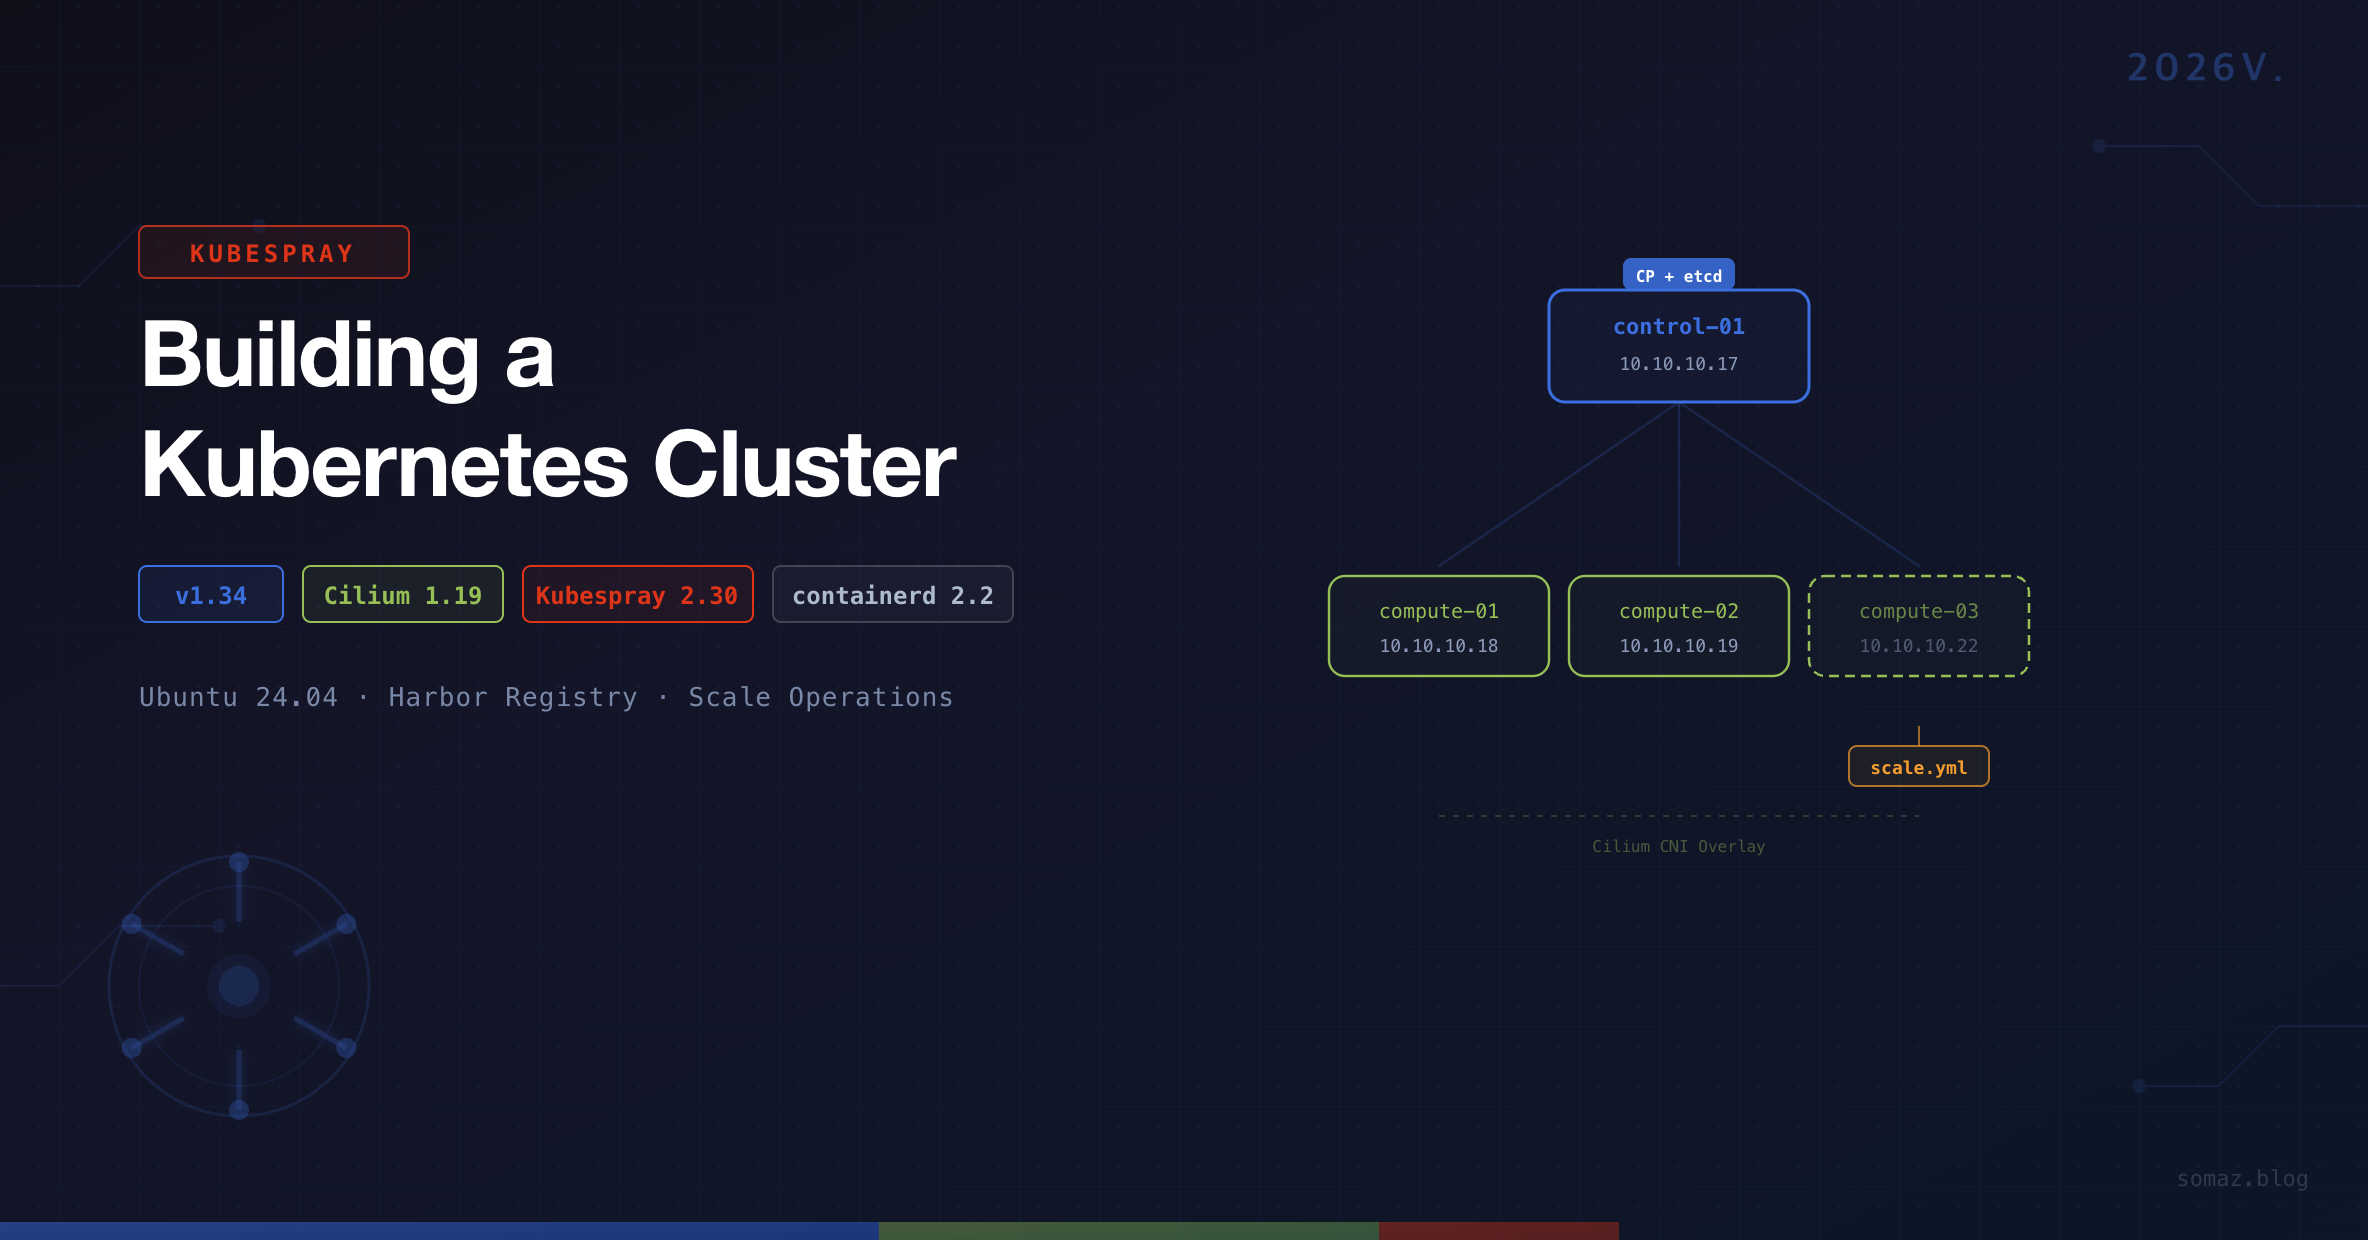
Node Specifications
| Role | Hostname | IP Address | CPU | Memory |
|---|---|---|---|---|
| Control Plane + etcd | k8s-control-01 | 10.10.10.17 | 4 cores | 24GB |
| Worker | k8s-compute-01 | 10.10.10.18 | 12 cores | 48GB |
| Worker | k8s-compute-02 | 10.10.10.19 | 12 cores | 48GB |
| Worker | k8s-compute-03 | 10.10.10.22 | 12 cores | 48GB |
We’ll first install up to k8s-compute-01, then add k8s-compute-02 and k8s-compute-03 using scale.yml.
Prerequisites
SSH Key Setup
All nodes must be accessible via SSH without password authentication.
# Generate SSH key
ssh-keygen

# Update /etc/hosts for easier node access
sudo vi /etc/hosts
10.10.10.17 k8s-control-01
10.10.10.18 k8s-compute-01
10.10.10.19 k8s-compute-02
10.10.10.22 k8s-compute-03

# Copy SSH key to all nodes
ssh-copy-id k8s-control-01
ssh-copy-id k8s-compute-01
ssh-copy-id k8s-compute-02

# Verify SSH connections
ssh k8s-control-01
ssh k8s-compute-01
ssh k8s-compute-02
Package Installation and Kubespray Setup
# Install Python 3.10 and required packages
sudo add-apt-repository ppa:deadsnakes/ppa
sudo apt-get -y update
sudo apt install -y python3.10 python3-pip git python3.10-venv

python3.10 --version

# Clone Kubespray repository
git clone https://github.com/kubernetes-sigs/kubespray.git
cd kubespray

# Checkout desired version
git checkout v2.30.0

# Copy sample inventory
cp -rfp inventory/sample inventory/somaz-cluster

# Create and activate virtual environment
python3.10 -m venv venv
source venv/bin/activate

# Install dependencies
pip install -U -r requirements.txt
Inventory Configuration
inventory.ini
inventory/somaz-cluster/inventory.ini
We’ll initially include only k8s-compute-01. k8s-compute-02 will be added later using scale.yml.
[kube_control_plane]
k8s-control-01 ansible_host=10.10.10.17 ip=10.10.10.17 etcd_member_name=etcd1

[etcd:children]
kube_control_plane

[kube_node]
k8s-compute-01
k8s-cluster.yml
inventory/somaz-cluster/group_vars/k8s_cluster/k8s-cluster.yml
# CNI plugin configuration
kube_network_plugin: cilium

# Cluster domain
cluster_name: somaz-cluster.local

# When using Cilium, kube_owner must be set to root
# https://kubespray.io/#/docs/CNI/cilium?id=unprivileged-agent-configuration
kube_owner: root
If kube_owner: root is not set, Cilium will encounter a /opt/cni/bin permission error. See: Cilium Issue #23838
addons.yml
inventory/somaz-cluster/group_vars/k8s_cluster/addons.yml
# Enable Helm
helm_enabled: true

# Enable Metrics Server
metrics_server_enabled: true

# Enable Krew (kubectl plugin manager)
krew_enabled: true
krew_root_dir: "/usr/local/krew"
containerd.yml — Insecure Registry Configuration
inventory/somaz-cluster/group_vars/all/containerd.yml
When using a private registry (e.g., Harbor) over HTTP, you need to add insecure registry settings to containerd. Defining this in the Kubespray inventory ensures it is automatically applied during node additions and upgrades.
# Harbor insecure registry configuration
containerd_registries_mirrors:
  - prefix: harbor.example.com
    mirrors:
      - host: http://harbor.example.com
        capabilities: ["pull", "resolve", "push"]
        skip_verify: true
        plain_http: true

# Harbor authentication
containerd_registry_auth:
  - registry: harbor.example.com
    username: admin
    password: your-password
Once applied, the file /etc/containerd/certs.d/harbor.example.com/hosts.toml is automatically generated on each node.
Best Practices for Insecure Registry
- Avoid modifying
hosts.tomldirectly on servers — Kubespray upgrades may overwrite manual changes. Always manage it through the inventory. - To verify the configuration after an upgrade:
ssh somaz@<node-ip> "cat /etc/containerd/certs.d/harbor.example.com/hosts.toml"
- If the configuration was lost, re-run the containerd tag to restore it:
ansible-playbook -i inventory/somaz-cluster/inventory.ini cluster.yml --tags containerd -b --become-user=root
Cluster Deployment
Verify Ansible Connectivity
Before deployment, verify that all nodes are reachable via Ansible.
# Must run from ~/kubespray directory
ansible all -i inventory/somaz-cluster/inventory.ini -m ping
Run the Playbook
# Foreground execution
ansible-playbook -i inventory/somaz-cluster/inventory.ini cluster.yml --become

# Background execution (recommended for long-running deployments)
nohup ansible-playbook -i inventory/somaz-cluster/inventory.ini cluster.yml --become &

# Monitor logs
tail -f nohup.out
Configure kubectl
After deployment, set up kubectl on the Control Plane node.
# Copy kubeconfig
mkdir ~/.kube
sudo cp /etc/kubernetes/admin.conf ~/.kube/config
sudo chown $USER:$USER ~/.kube/config

# Set up completion and aliases
echo '# kubectl completion and alias' >> ~/.bashrc
echo 'source <(kubectl completion bash)' >> ~/.bashrc
echo 'alias k=kubectl' >> ~/.bashrc
echo 'complete -F __start_kubectl k' >> ~/.bashrc
source ~/.bashrc
Verify Installation
k get nodes
NAME             STATUS   ROLES           AGE    VERSION
k8s-compute-01   Ready    <none>          2d4h   v1.34.3
k8s-control-01   Ready    control-plane   2d4h   v1.34.3

k version
Client Version: v1.34.3
Kustomize Version: v5.6.0
Server Version: v1.34.3

containerd --version
containerd github.com/containerd/containerd/v2 v2.2.1

# Check Cilium version
k get ds cilium -n kube-system -o=jsonpath='{.spec.template.spec.containers[0].image}'
quay.io/cilium/cilium:v1.19.1
Troubleshooting: Cilium Permission Error
When using Cilium as the CNI, permission issues with the /opt/cni/bin directory can cause errors.
Symptoms
Pods get stuck in Init:CrashLoopBackOff state, or Cilium agent logs show permission-related errors.
Fix 1: Manual Permission Change
chown -R root:root /opt/cni/bin
Fix 2: Kubespray Configuration (Recommended)
inventory/somaz-cluster/group_vars/k8s_cluster/k8s-cluster.yml
# Default
# kube_owner: kube

# Change to root when using Cilium
kube_owner: root
Starting from Kubespray v2.30.0, the official comment # Note: cilium needs to set kube_owner to root has been added. See: Cilium Issue #23838
Adding Worker Nodes (Scale Up)
Step 1. Preparation
# Add new node to /etc/hosts
sudo vi /etc/hosts
10.10.10.19 k8s-compute-02

# Copy SSH key
ssh-copy-id k8s-compute-02
Step 2. Update inventory.ini
[kube_control_plane]
k8s-control-01 ansible_host=10.10.10.17 ip=10.10.10.17 etcd_member_name=etcd1

[etcd:children]
kube_control_plane

[kube_node]
k8s-compute-01
k8s-compute-02    # New node added

[add_node]
k8s-compute-02    # Target for scale.yml
Step 3. Gather Facts (Critical!)
You must gather facts from existing nodes first. Skipping this step will cause an ipwrap error.
ansible-playbook -i inventory/somaz-cluster/inventory.ini playbooks/facts.yml --become
If you skip this step, you will encounter the following error:
AnsibleFilterError: Unrecognized type for ipwrap filterStep 4. Run scale.yml
# Run scale.yml targeting only the new node
nohup ansible-playbook -i inventory/somaz-cluster/inventory.ini scale.yml --limit add_node --become &

# Monitor logs
tail -f nohup.out
Step 5. Verify and Clean Up
k get nodes
NAME             STATUS   ROLES           AGE    VERSION
k8s-compute-01   Ready    <none>          2d5h   v1.34.3
k8s-compute-02   Ready    <none>          1m     v1.34.3
k8s-control-01   Ready    control-plane   2d5h   v1.34.3
After verification, comment out or remove the [add_node] section:
# [add_node]
# k8s-compute-02  # Already added
Removing Worker Nodes (Scale Down)
cd ~/kubespray
source venv/bin/activate

ansible-playbook -i inventory/somaz-cluster/inventory.ini remove-node.yml -b --extra-vars='node=k8s-compute-02' --extra-vars reset_nodes=true
After completion, remove the node from inventory.ini.
Operational Tips
Inventory Local Backup
Backing up the Control Plane’s inventory locally can be useful for recovery during server failures.
scp -r somaz@10.10.10.17:~/kubespray/inventory/somaz-cluster ~/my-project/kubespray/inventory-somaz-cluster
Version Check Script
Create a script for quick cluster status verification.
#!/bin/bash
echo "=== K8s Version ==="
kubectl get nodes -o wide

echo ""
echo "=== Kubespray Version ==="
cd ~/kubespray && git describe --tags

echo ""
echo "=== Containerd Version ==="
containerd --version

echo ""
echo "=== Cilium Version ==="
kubectl get ds cilium -n kube-system -o=jsonpath='{.spec.template.spec.containers[0].image}'
echo ""

echo ""
echo "=== Certificate Expiration ==="
sudo kubeadm certs check-expiration 2>/dev/null | head -15
Important Notes Summary
| Item | Description |
|---|---|
| venv | Always ensure Kubespray's Python venv is activated (source venv/bin/activate) |
| Path | All ansible-playbook commands must be run from ~/kubespray directory |
| facts.yml | Must be run before adding nodes (prevents ipwrap error) |
| kube_owner | Must be set to root when using Cilium |
| Insecure Registry | Manage through inventory instead of direct server modification |
| etcd Backup | Always create a snapshot before upgrades |
| StatefulSet | Verify data before draining nodes |
| Replicas | Maintain at least 2 Deployment replicas for zero-downtime services |
Conclusion
Kubespray goes beyond simple installation automation to enable production-level Kubernetes cluster configuration. It’s particularly useful in the following scenarios:
- Quick deployment needs in on-premises or private cloud environments
- Automated HA cluster, MetalLB/Ingress configuration
- IaC-based infrastructure management through Terraform + Ansible integration
- Repeated creation and removal of test clusters in CI environments
Establishing the flow of Ansible-based automation → Cluster construction → GitOps-based app deployment can elevate operational automation to the next level.
The next post will cover Kubernetes cluster upgrades using Kubespray.

Comments