13 min to read
IPVS vs iptables in Kubernetes
A comprehensive comparison of kube-proxy modes for service networking
Overview
Kubernetes Service networking is implemented through the kube-proxy component, which is responsible for routing traffic to the appropriate backend Pods. This component supports multiple proxy modes, with iptables and IPVS being the most commonly used options. Understanding the differences between these modes is crucial for optimizing your cluster’s networking performance.
- How kube-proxy implements Service networking in Kubernetes
- The architecture and operation of iptables and IPVS proxy modes
- Performance characteristics and scalability considerations
- How to configure and switch between proxy modes
- Best practices for production environments
The Role of kube-proxy in Kubernetes
kube-proxy is a network proxy that runs on each node in your Kubernetes cluster, implementing part of the Kubernetes Service concept. Its primary responsibility is to:
- Watch the Kubernetes API server for changes to Service and Endpoint objects
- Maintain network rules that allow communication to Pods via Kubernetes Services
- Perform connection forwarding or load balancing across a set of backend Pods
Kubernetes has evolved through several proxy implementations:
- userspace (original mode): Simple but inefficient
- iptables (default since Kubernetes 1.2): Better performance
- IPVS (added in Kubernetes 1.8, stable in 1.11): Designed for high throughput
Concepts of IPVS and iptables
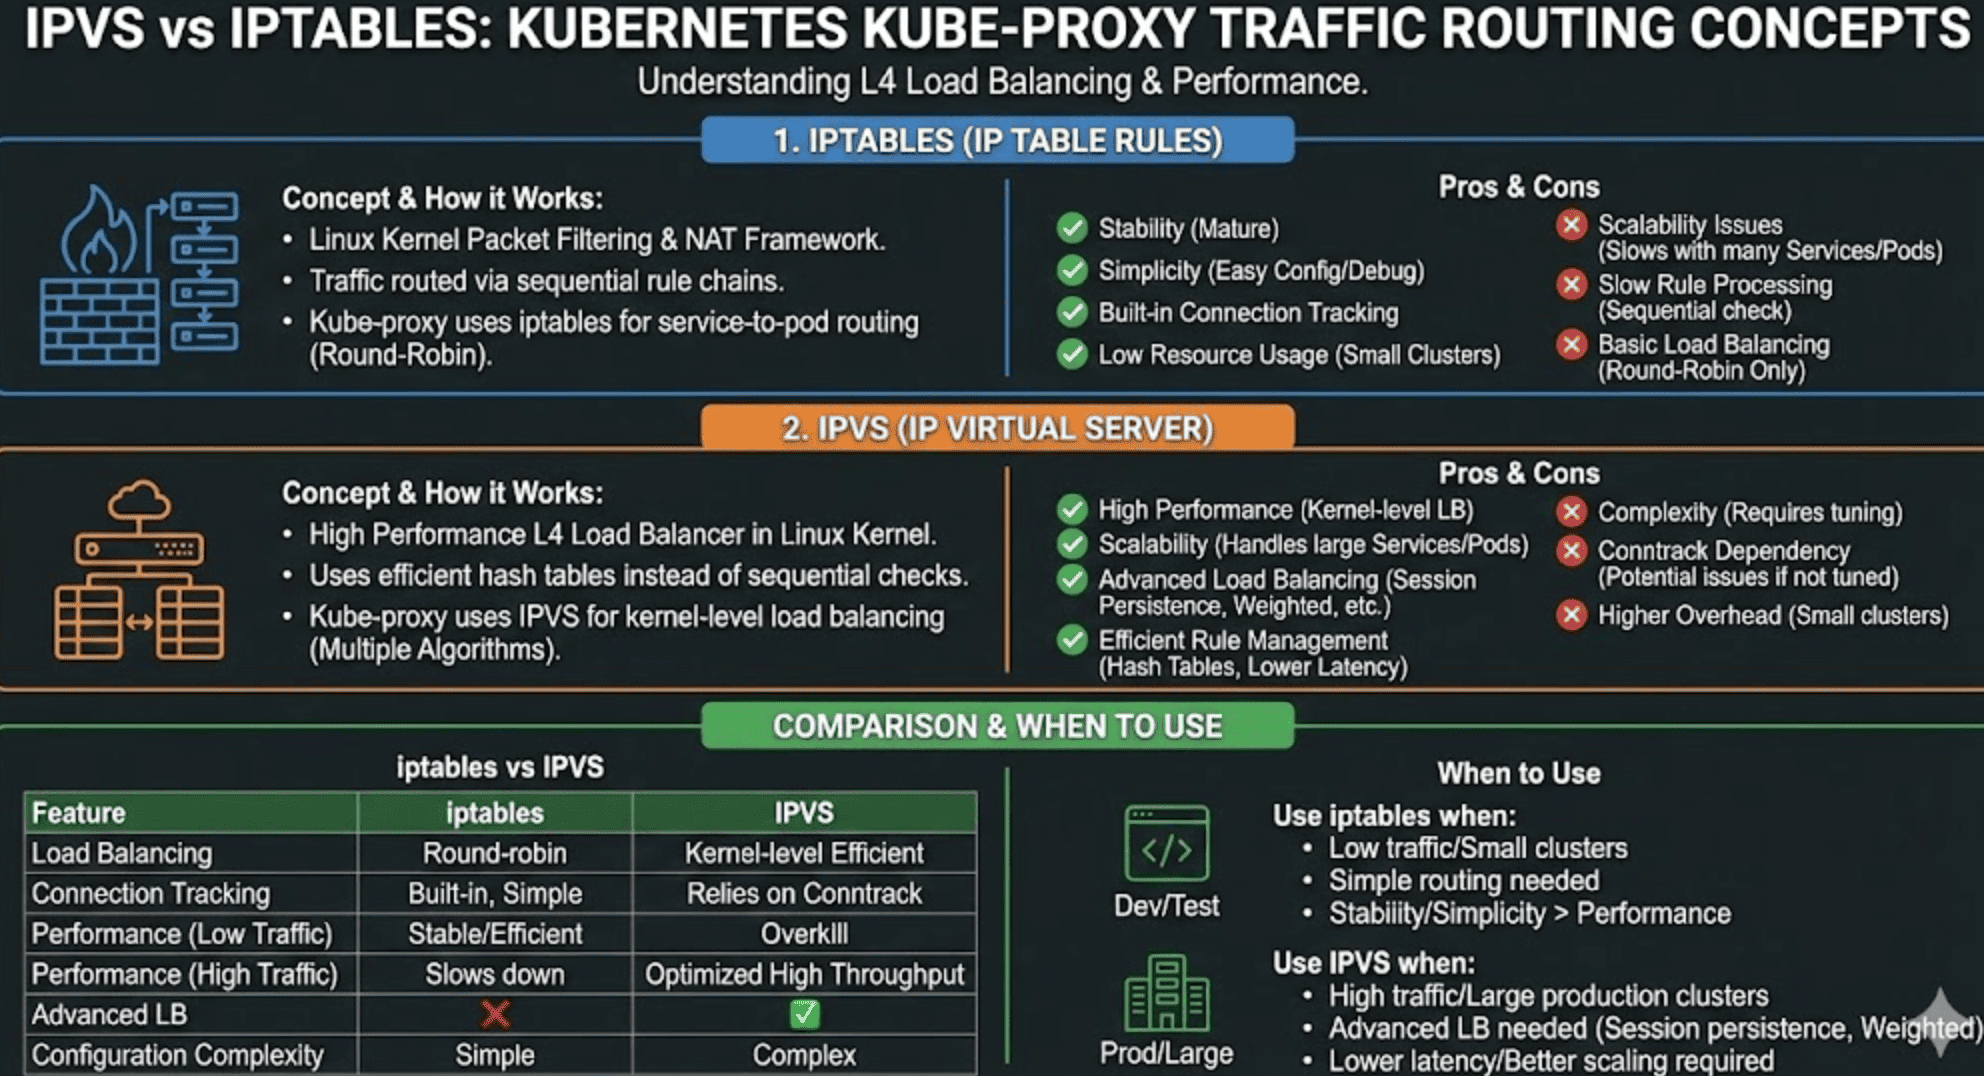
1️⃣ iptables Mode
iptablesis a packet filtering and NAT (Network Address Translation) framework built into the Linux kernel. It defines rules that packets must pass through and decides whether to allow, deny, forward, or modify network traffic.
load balancing I->>P: DNAT to selected Pod IP:Port P->>C: Response (SNAT on return)
How iptables mode works in Kubernetes:
- kube-proxy watches for Service and Endpoint changes
- For each Service, it creates iptables rules in multiple chains:
KUBE-SERVICES: Entry point for service processingKUBE-SVC-XXX: Chain for each service with probability-based rule selectionKUBE-SEP-XXX: Chain for each service endpoint with DNAT rules
# Example iptables rules for a Service with ClusterIP 10.96.0.1 and port 80
# Main chain entry
iptables -t nat -A PREROUTING -j KUBE-SERVICES
iptables -t nat -A KUBE-SERVICES -d 10.96.0.1/32 -p tcp -m tcp --dport 80 -j KUBE-SVC-XYZABC

# Load balancing rules (3 endpoints with equal probability)
iptables -t nat -A KUBE-SVC-XYZABC -m statistic --mode random --probability 0.33333 -j KUBE-SEP-1
iptables -t nat -A KUBE-SVC-XYZABC -m statistic --mode random --probability 0.50000 -j KUBE-SEP-2
iptables -t nat -A KUBE-SVC-XYZABC -j KUBE-SEP-3

# Endpoint translation rules
iptables -t nat -A KUBE-SEP-1 -p tcp -j DNAT --to-destination 10.244.1.2:8080
iptables -t nat -A KUBE-SEP-2 -p tcp -j DNAT --to-destination 10.244.2.3:8080
iptables -t nat -A KUBE-SEP-3 -p tcp -j DNAT --to-destination 10.244.3.4:8080
Advantages of iptables mode:
✅ Stability: Mature and widely used on Linux systems since the early 2000s
✅ Simplicity: Easy to configure and troubleshoot with standard Linux tools
✅ Built-in connection tracking: Provides stateful packet filtering without additional configuration
✅ Low resource usage: Efficient in small clusters with few services and endpoints
✅ Reliable failover: Dead endpoints are automatically removed from the rotation
Disadvantages of iptables mode:
❌ O(n) rule processing complexity: Each packet must traverse rules linearly
❌ Performance degradation with scale: Significant slowdown with many services/endpoints
❌ Update latency: Rule changes become expensive with thousands of services
❌ Limited load balancing capabilities: Only random probability-based distribution
❌ Connection reset during updates: Can drop connections when rules change
2️⃣ IP Virtual Server (IPVS) Mode
IPVS is a layer 4 load balancer in the Linux kernel designed specifically for high performance and scalability. Unlike iptables, which processes rules sequentially, IPVS uses a hash table for efficient lookup.
How IPVS mode works in Kubernetes:
- kube-proxy creates an IPVS virtual server for each Service IP:Port
- Each backend Pod is added as a real server to the virtual server
- IPVS handles load balancing using its selected scheduling algorithm
- kube-proxy still uses some iptables rules for packet filtering, but not for NAT
# Example IPVS configuration for a Service
# View with: ipvsadm -ln

# Virtual Server (Service VIP and port)
-A -t 10.96.0.1:80 -s rr

# Real Servers (Endpoints)
-a -t 10.96.0.1:80 -r 10.244.1.2:8080 -m masq
-a -t 10.96.0.1:80 -r 10.244.2.3:8080 -m masq
-a -t 10.96.0.1:80 -r 10.244.3.4:8080 -m masq
IPVS Supported Load Balancing Algorithms:
| Algorithm | Description | Use Case |
|---|---|---|
rr |
Round-Robin: Simple rotation through backends | General-purpose, similar backends |
lc |
Least Connection: Routes to server with fewest active connections | Variable connection duration workloads |
dh |
Destination Hashing: Based on destination IP | When specific clients need specific backends |
sh |
Source Hashing: Based on source IP (session affinity) | Stateful applications requiring sticky sessions |
sed |
Shortest Expected Delay: Considers both connections and weights | Heterogeneous backend capacity |
nq |
Never Queue: Assigns to idle server if available | Mixed-load environments |
Advantages of IPVS mode:
✅ O(1) lookup complexity: Hash tables provide consistent performance regardless of cluster size
✅ High performance: Optimized for large-scale load balancing with low latency
✅ Multiple load balancing algorithms: Flexible options for different workloads
✅ Connection persistence: Support for maintaining client affinity to backends
✅ Better scalability: Efficiently handles thousands of services with minimal degradation
✅ Lower CPU usage: More efficient at scale compared to iptables
Disadvantages of IPVS mode:
❌ Complexity: Requires additional kernel modules and configuration
❌ Dependency management: Needs conntrack modules properly configured
❌ Limited packet filtering: Still requires some iptables rules for certain functionality
❌ Debugging difficulty: Less familiar to many administrators
❌ Potential kernel compatibility issues: Requires specific kernel modules
Performance Comparison
As Kubernetes clusters grow in size, the difference in performance between iptables and IPVS becomes more pronounced.
Real-world Performance Data
In a large-scale Kubernetes environment (5000+ services):
- iptables mode: Service sync time can exceed 5 minutes
- IPVS mode: Service sync time typically under 2 minutes
- CPU usage for kube-proxy can be 3-4x higher in iptables mode at scale
- Connection throughput in IPVS mode can be up to 5x higher than iptables
iptables vs IPVS: Detailed Comparison
| 🔑 Feature | 📃 iptables | 🚀 IPVS |
|---|---|---|
| Implementation | NAT-based packet filtering framework | Layer 4 load balancer using hash tables |
| Lookup Complexity | O(n) - linear with number of rules | O(1) - constant time using hash tables |
| Rule Structure | Chains of sequential rules | Hash table with virtual/real servers |
| Load Balancing Methods | Random selection with weights | Multiple algorithms (rr, lc, dh, sh, sed, nq) |
| Session Affinity | Limited support (ClientIP) | Strong support via multiple methods |
| Rule Updates | Slow at scale, can affect traffic | Fast updates with minimal disruption |
| Production Readiness | Very stable, extensively tested | Stable since Kubernetes 1.11 |
| Memory Usage | Lower in small clusters | Higher baseline, more efficient at scale |
| CPU Usage | Increases linearly with services | Remains relatively constant with scale |
| Connection Tracking | Built-in, simple | Relies on conntrack (more complex) |
| Configuration Complexity | Simple and familiar | Requires additional modules and tuning |
| Debugging Tools | Widely available (iptables-save) |
Less common (ipvsadm) |
Configuring kube-proxy Mode
Checking Current Mode
To check which mode your kube-proxy is using:
# View kube-proxy ConfigMap
kubectl -n kube-system get configmap kube-proxy -o yaml | grep mode

# Or check kube-proxy logs
kubectl -n kube-system logs -l k8s-app=kube-proxy | grep "Using"
Switching to IPVS Mode
To switch to IPVS mode, follow these steps:
1. First, ensure your nodes have the required kernel modules:
# Check for required modules
lsmod | grep -e ip_vs -e nf_conntrack

# Load modules if needed
modprobe -- ip_vs
modprobe -- ip_vs_rr
modprobe -- ip_vs_wrr
modprobe -- ip_vs_sh
modprobe -- nf_conntrack
2. Edit the kube-proxy ConfigMap:
kubectl -n kube-system edit configmap kube-proxy
3. Update the mode in the ConfigMap:
# Find this section
data:
  config.conf: |-
    apiVersion: kubeproxy.config.k8s.io/v1alpha1
    kind: KubeProxyConfiguration
    mode: "ipvs"  # Change from "iptables" to "ipvs"
    # Add IPVS-specific settings if needed
    ipvs:
      scheduler: "rr"  # Default is rr (round robin)
4. Restart kube-proxy pods:
kubectl -n kube-system delete pods -l k8s-app=kube-proxy
5. Verify the change:
# Check if IPVS modules are loaded
kubectl -n kube-system exec -it $(kubectl -n kube-system get pods -l k8s-app=kube-proxy -o name | head -n 1) -- lsmod | grep ip_vs

# Check IPVS rules
kubectl -n kube-system exec -it $(kubectl -n kube-system get pods -l k8s-app=kube-proxy -o name | head -n 1) -- ipvsadm -ln
IPVS Optimization for Production
For optimal IPVS performance in production environments, consider the following optimizations:
Connection Tracking Tuning
# Increase connection tracking table size
sysctl -w net.netfilter.nf_conntrack_max=1000000

# Increase timeout for UDP connections
sysctl -w net.netfilter.nf_conntrack_udp_timeout=60
sysctl -w net.netfilter.nf_conntrack_udp_timeout_stream=180

# Make sure these settings persist
cat > /etc/sysctl.d/95-ipvs.conf << EOF
net.netfilter.nf_conntrack_max=1000000
net.netfilter.nf_conntrack_tcp_timeout_established=900
net.netfilter.nf_conntrack_udp_timeout=60
net.netfilter.nf_conntrack_udp_timeout_stream=180
EOF
IPVS Scheduler Selection
Choose the appropriate scheduling algorithm based on your workload:
# In kube-proxy ConfigMap
ipvs:
  scheduler: "rr"  # Options: rr, lc, dh, sh, sed, nq

  # For sticky sessions based on client IP
  scheduler: "sh"

  # For backend pods with different capacities
  scheduler: "lc"
Graceful Termination
Consider increasing terminationGracePeriodSeconds in your deployments to allow connections to drain properly before Pod termination.
When to Use Each Mode
Use iptables Mode When:
✅ Small Cluster Size: Running fewer than ~200 services
✅ Development Environment: Simplicity is more important than performance
✅ Kernel Compatibility: Working with older or restricted kernels
✅ Low Resource Requirements: Operating in constrained environments
✅ Familiar Tooling: Team has strong experience with iptables debugging
Use IPVS Mode When:
✅ Large Cluster Size: Running hundreds or thousands of services
✅ Production Environment: Performance and scale are critical
✅ Advanced Load Balancing: Need specific algorithms or sticky sessions
✅ High Throughput: Processing many connections per second
✅ Frequent Service Changes: Need faster service update times
iptables → Simple, reliable, and better for small, low-traffic environments. Excellent default choice for getting started with Kubernetes.
IPVS → High-performance, scalable, and ideal for production systems with complex networking requirements. Worth the additional setup complexity for large clusters.
Starting with Kubernetes 1.20, the userspace proxy mode has been deprecated in favor of iptables and IPVS. If you're still using userspace mode, consider migrating to one of these two options.


Comments