25 min to read
Vagrant with KVM: Complete Infrastructure Automation for Development Environments
Comprehensive guide to setting up and managing virtual machines using Vagrant with KVM backend for efficient development workflows
Overview
In modern software development, maintaining consistent and reproducible development environments across teams remains a significant challenge.
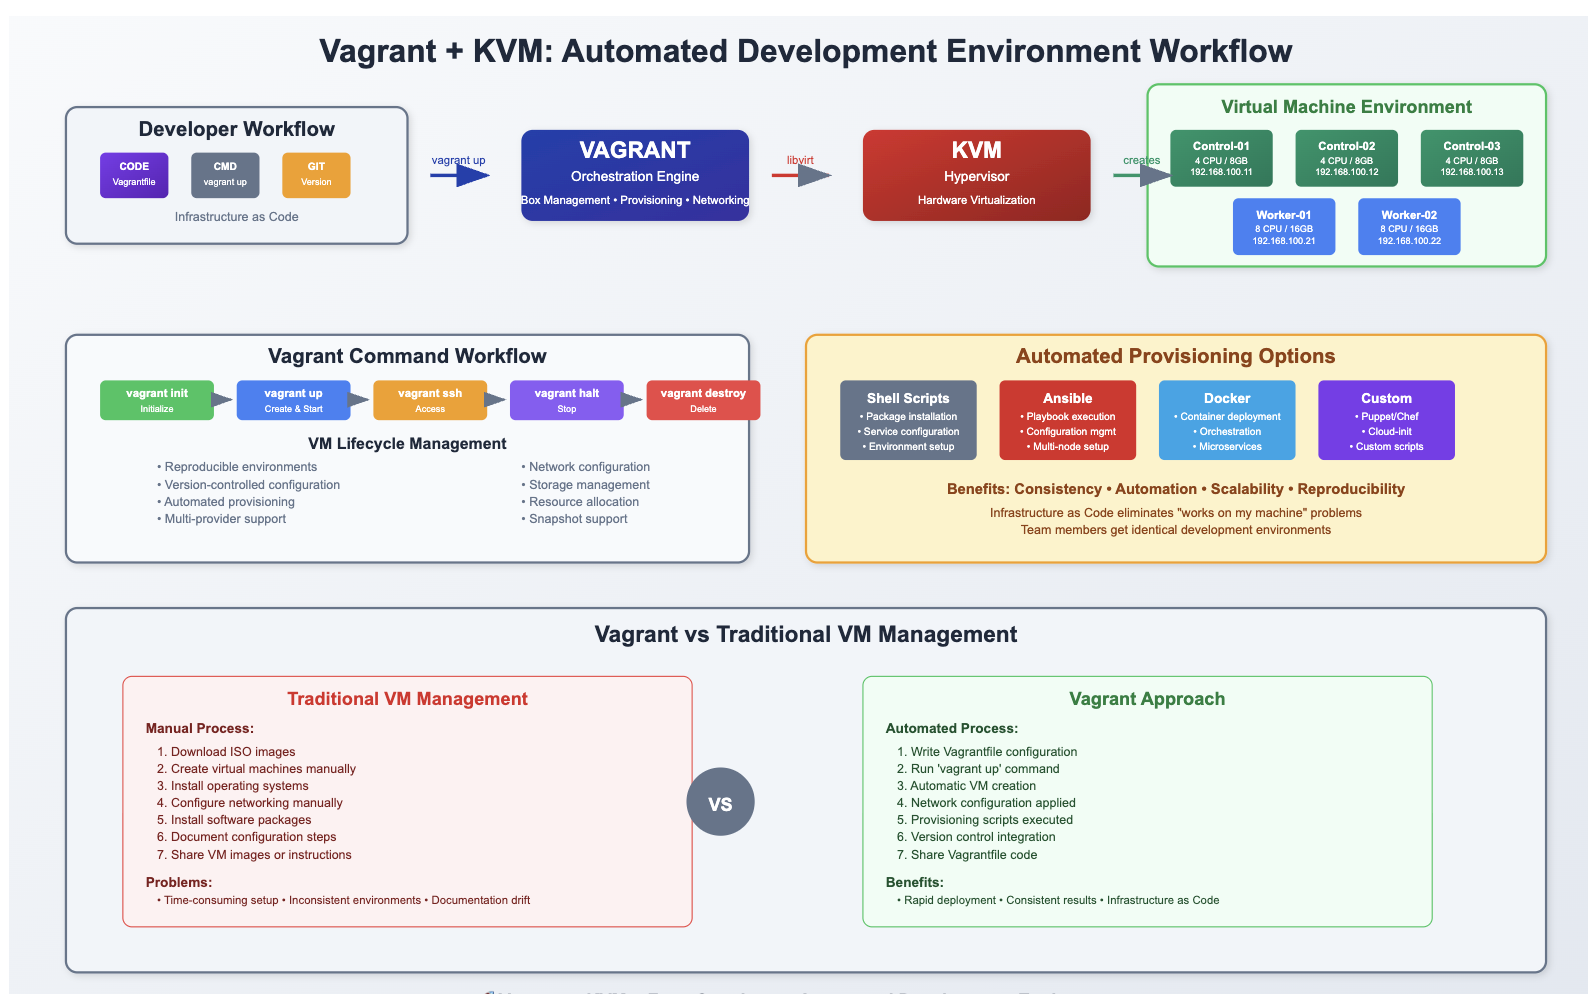
Vagrant addresses this challenge by providing a powerful automation tool for building and managing virtual machine environments with minimal configuration overhead.
This comprehensive guide focuses on Vagrant integration with KVM (Kernel-based Virtual Machine) as the virtualization backend, offering superior performance compared to traditional solutions.
We’ll cover everything from KVM setup and configuration to advanced Vagrant workflows, including multi-machine environments and automated provisioning.
Vagrant excels at project-based VM management, enabling developers to create, destroy, and configure development environments with simple commands.
When combined with Ansible, Terraform, and other DevOps tools, Vagrant becomes a cornerstone of infrastructure automation workflows.
What is Vagrant?
Vagrant is an open-source tool for building and managing virtual machine environments in a single workflow.
With an easy-to-use interface and focus on automation, Vagrant lowers development environment setup time, increases production parity, and makes the “works on my machine” excuse a relic of the past.
Core Features:
- Automated VM Environment Setup: Single command deployment
- Multiple Provider Support: KVM, VirtualBox, Docker, AWS, and more
- Provisioning Integration: Ansible, Puppet, Chef, Shell scripts
- Project-based Management: Isolated environments per project
- Version Control Friendly: Infrastructure as Code principles
- Cross-platform Compatibility: Windows, macOS, Linux support
Use Cases:
Development Environment Standardization
- Consistent development stacks across team members
- Isolated testing environments for different projects
- Rapid onboarding for new team members
Infrastructure Testing
- Multi-node cluster simulation
- Network topology testing
- Disaster recovery scenarios
CI/CD Integration
- Automated testing environments
- Build and deployment pipelines
- Quality assurance workflows
KVM Installation and Configuration
Step 1: Install KVM Virtualization Host
# Install virtualization packages
yum -y group install 'Virtualization Host'

# Alternative for Ubuntu/Debian systems
apt-get install -y qemu-kvm libvirt-daemon-system libvirt-clients bridge-utils

# Verify KVM module availability
lsmod | grep kvm
# Expected output:
# kvm_intel (or kvm_amd)
# kvm
Step 2: Configure Nested Virtualization
# Check current nested virtualization status
cat /sys/module/kvm_intel/parameters/nested
# Y = enabled, N = disabled

# Enable nested virtualization for Intel processors
cat > /etc/modprobe.d/kvm-nested.conf << 'EOF'
options kvm-intel nested=1
options kvm-intel enable_shadow_vmcs=1
options kvm-intel enable_apicv=1
options kvm-intel ept=1
EOF

# For AMD processors
cat > /etc/modprobe.d/kvm-nested.conf << 'EOF'
options kvm-amd nested=1
EOF
Step 3: Apply Kernel Module Changes
# Remove and reload KVM modules
modprobe -r kvm_intel  # or kvm_amd for AMD
modprobe -a kvm_intel  # or kvm_amd for AMD

# Verify nested virtualization is enabled
cat /sys/module/kvm_intel/parameters/nested
# Should return: Y
Step 4: Configure PCI Passthrough and SR-IOV
# Edit GRUB configuration for hardware passthrough
vi /etc/default/grub

# Add IOMMU support to GRUB_CMDLINE_LINUX
GRUB_CMDLINE_LINUX="nofb splash=quiet console=tty0 intel_iommu=on iommu=pt"

# For AMD systems, use:
# GRUB_CMDLINE_LINUX="nofb splash=quiet console=tty0 amd_iommu=on iommu=pt"

# Update GRUB configuration
grub2-mkconfig -o /boot/grub2/grub.cfg

# For Ubuntu/Debian systems:
# update-grub
Step 5: Enable IPv4 Forwarding
# Configure permanent IPv4 forwarding
echo 'net.ipv4.ip_forward = 1' >> /etc/sysctl.conf

# Apply immediately without reboot
sysctl -p

# Verify setting
sysctl net.ipv4.ip_forward
# Should return: net.ipv4.ip_forward = 1
Step 6: System Restart and Validation
# Restart system to apply all changes
systemctl reboot

# After reboot, validate KVM environment
virt-host-validate

# Expected output should show all PASS results:
# QEMU: Checking for hardware virtualization: PASS
# QEMU: Checking if device /dev/kvm exists: PASS
# QEMU: Checking if device /dev/kvm is accessible: PASS
# LXC: Checking for Linux >= 2.6.26: PASS
Vagrant Installation and Setup
Step 1: Install Vagrant and Dependencies
# Add HashiCorp repository
sudo yum-config-manager --add-repo https://rpm.releases.hashicorp.com/RHEL/hashicorp.repo

# Install Vagrant
sudo yum -y install vagrant

# Install required development packages
sudo yum -y install qemu libvirt libvirt-devel ruby-devel gcc qemu-kvm libguestfs-tools

# For Ubuntu/Debian systems:
# curl -fsSL https://apt.releases.hashicorp.com/gpg | sudo apt-key add -
# sudo apt-add-repository "deb [arch=amd64] https://apt.releases.hashicorp.com $(lsb_release -cs) main"
# sudo apt-get update && sudo apt-get install vagrant
Step 2: Install Vagrant Plugins
# Install libvirt provider plugin
vagrant plugin install vagrant-libvirt

# Install image conversion plugin
vagrant plugin install vagrant-mutate

# Install additional useful plugins
vagrant plugin install vagrant-reload
vagrant plugin install vagrant-vbguest

# Verify installed plugins
vagrant plugin list
Step 3: Configure KVM Storage Pool for Vagrant
# Prepare dedicated storage for Vagrant VMs (optional but recommended)
# Assume /dev/sdb1 is available for VM storage
mkfs.xfs /dev/sdb1

# Create mount point
mkdir -p /var/lib/libvirt/vagrant

# Add to fstab for persistent mounting
echo "$(blkid /dev/sdb1 -o export | grep ^UUID) /var/lib/libvirt/vagrant xfs defaults 0 0" >> /etc/fstab

# Mount the filesystem
mount -a

# Create libvirt storage pool
virsh pool-define-as --name vagrant --type dir --target /var/lib/libvirt/vagrant

# Start and enable autostart for the pool
virsh pool-start vagrant
virsh pool-autostart vagrant

# Verify pool creation
virsh pool-list --all
Step 4: Configure Libvirt Service
# Start and enable libvirt services
systemctl start libvirtd
systemctl enable libvirtd

# Add user to libvirt group
usermod -a -G libvirt $(whoami)

# Configure libvirt for user access
echo 'unix_sock_group = "libvirt"' >> /etc/libvirt/libvirtd.conf
echo 'unix_sock_rw_perms = "0770"' >> /etc/libvirt/libvirtd.conf

# Restart libvirt service
systemctl restart libvirtd
Vagrant Project Structure and Workflow
Understanding Vagrant Project Structure
Vagrant operates on a project-based approach where each directory containing a Vagrantfile represents a separate project environment:
# Typical Vagrant project structure
my-vagrant-project/
├── Vagrantfile              # Main configuration file
├── provisioning/            # Provisioning scripts directory
│   ├── bootstrap.sh        # Initial setup script
│   ├── install-docker.sh   # Application-specific scripts
│   └── ansible/            # Ansible playbooks
│       ├── playbook.yml
│       └── inventory/
├── shared/                  # Shared folders content
│   └── application-code/
└── .vagrant/               # Vagrant metadata (auto-generated)
    ├── machines/
    └── provisioners/
Project Initialization
# Create new project directory
mkdir my-development-environment
cd my-development-environment

# Initialize Vagrant environment
vagrant init

# This creates a basic Vagrantfile with default configuration
# The current directory becomes the Vagrant project root
Vagrant Commands Overview
# Core Vagrant commands
vagrant init [box-name]      # Initialize new Vagrant environment
vagrant up                   # Create and provision VM
vagrant halt                 # Gracefully shutdown VM
vagrant destroy              # Delete VM and resources
vagrant ssh                  # SSH into running VM
vagrant reload               # Restart VM with new configuration
vagrant provision            # Run provisioning scripts
vagrant status               # Show VM status
vagrant global-status        # Show all Vagrant environments
Vagrantfile Configuration
Basic Single-VM Configuration
# -*- mode: ruby -*-
# vi: set ft=ruby :

# Set default provider to libvirt
ENV['VAGRANT_DEFAULT_PROVIDER'] = 'libvirt'

Vagrant.configure("2") do |config|
  # Base box configuration
  config.vm.box = "generic/ubuntu2004"
  config.vm.box_version = "3.6.8"

  # VM hostname
  config.vm.hostname = "dev-server"

  # Disable default shared folder
  config.vm.synced_folder ".", "/vagrant", disabled: true

  # Network configuration
  config.vm.network "private_network",
    ip: "192.168.56.10",
    libvirt__network_name: "development",
    libvirt__forward_mode: "nat",
    libvirt__dhcp_enabled: false

  # Port forwarding
  config.vm.network "forwarded_port", guest: 80, host: 8080
  config.vm.network "forwarded_port", guest: 22, host: 2222

  # Provider-specific configuration
  config.vm.provider "libvirt" do |libvirt|
    libvirt.memory = 4096
    libvirt.cpus = 2
    libvirt.storage_pool_name = "vagrant"
    libvirt.machine_virtual_size = 40  # GB
    libvirt.graphics_ip = "0.0.0.0"
    libvirt.graphics_port = 5900
    libvirt.video_type = "qxl"
  end

  # Provisioning
  config.vm.provision "shell", inline: <<-SHELL
    apt-get update
    apt-get install -y nginx
    systemctl start nginx
    systemctl enable nginx
  SHELL
end
Advanced Multi-VM Configuration
# -*- mode: ruby -*-
# vi: set ft=ruby :

ENV['VAGRANT_DEFAULT_PROVIDER'] = 'libvirt'

Vagrant.configure("2") do |config|
  # Environment variables
  CONTROL_COUNT = 3
  WORKER_COUNT = 2
  STORAGE_COUNT = 1

  # Base configuration for all VMs
  config.vm.box = "generic/centos8"
  config.vm.synced_folder ".", "/vagrant", disabled: true

  # Control plane nodes
  (1..CONTROL_COUNT).each do |i|
    config.vm.define "control#{i.to_s.rjust(2, '0')}" do |control|
      control.vm.hostname = "control#{i.to_s.rjust(2, '0')}"

      # Network configuration
      control.vm.network "private_network",
        ip: "192.168.100.1#{i}",
        libvirt__network_name: "k8s-cluster",
        libvirt__forward_mode: "nat",
        libvirt__dhcp_enabled: false

      # Management network
      control.vm.network "private_network",
        ip: "10.0.0.1#{i}",
        libvirt__network_name: "management",
        libvirt__forward_mode: "none",
        libvirt__dhcp_enabled: false

      # Provider configuration
      control.vm.provider "libvirt" do |libvirt|
        libvirt.memory = 8192
        libvirt.cpus = 4
        libvirt.storage_pool_name = "vagrant"
        libvirt.machine_virtual_size = 100
        libvirt.management_network_name = "management"
        libvirt.management_network_mac = "52:54:00:#{sprintf('%02x', 10 + i)}:#{sprintf('%02x', i)}:01"
      end

      # Port forwarding for API server
      if i == 1
        control.vm.network "forwarded_port", guest: 6443, host: 6443
      end

      # Provisioning
      control.vm.provision "shell", path: "scripts/common-setup.sh"
      control.vm.provision "shell", path: "scripts/control-plane-setup.sh",
        args: [i, CONTROL_COUNT, WORKER_COUNT]
    end
  end

  # Worker nodes
  (1..WORKER_COUNT).each do |i|
    config.vm.define "worker#{i.to_s.rjust(2, '0')}" do |worker|
      worker.vm.hostname = "worker#{i.to_s.rjust(2, '0')}"

      worker.vm.network "private_network",
        ip: "192.168.100.2#{i}",
        libvirt__network_name: "k8s-cluster",
        libvirt__forward_mode: "nat",
        libvirt__dhcp_enabled: false

      worker.vm.provider "libvirt" do |libvirt|
        libvirt.memory = 16384
        libvirt.cpus = 8
        libvirt.storage_pool_name = "vagrant"
        libvirt.machine_virtual_size = 200
      end

      worker.vm.provision "shell", path: "scripts/common-setup.sh"
      worker.vm.provision "shell", path: "scripts/worker-setup.sh"
    end
  end

  # Storage nodes
  (1..STORAGE_COUNT).each do |i|
    config.vm.define "storage#{i.to_s.rjust(2, '0')}" do |storage|
      storage.vm.hostname = "storage#{i.to_s.rjust(2, '0')}"

      storage.vm.network "private_network",
        ip: "192.168.100.3#{i}",
        libvirt__network_name: "k8s-cluster",
        libvirt__forward_mode: "nat",
        libvirt__dhcp_enabled: false

      storage.vm.provider "libvirt" do |libvirt|
        libvirt.memory = 32768
        libvirt.cpus = 16
        libvirt.storage_pool_name = "vagrant"
        libvirt.machine_virtual_size = 100

        # Additional storage disks for Ceph
        (1..3).each do |disk|
          libvirt.storage :file,
            size: "50G",
            path: "storage#{i.to_s.rjust(2, '0')}-disk#{disk}.qcow2",
            bus: "virtio"
        end
      end

      storage.vm.provision "shell", path: "scripts/common-setup.sh"
      storage.vm.provision "shell", path: "scripts/storage-setup.sh"
    end
  end
end
Provisioning Script Examples
Vagrant Box Management
Working with Vagrant Boxes
# List available boxes
vagrant box list

# Add a new box
vagrant box add generic/ubuntu2004

# Add box with specific provider
vagrant box add generic/centos8 --provider libvirt

# Update existing box
vagrant box update --box generic/ubuntu2004

# Remove old box versions
vagrant box prune

# Create custom box from existing VM
vagrant package --output my-custom-box.box
vagrant box add my-custom-box my-custom-box.box
Box Version Management
# Vagrantfile with version constraints
Vagrant.configure("2") do |config|
  config.vm.box = "generic/ubuntu2004"
  config.vm.box_version = ">= 3.6.0, < 4.0"
  config.vm.box_check_update = true

  # Box download configuration
  config.vm.box_download_checksum = "sha256_checksum_here"
  config.vm.box_download_checksum_type = "sha256"
end
Custom Box Creation
# Create custom box from existing VM
vagrant package --vagrantfile Vagrantfile.pkg --output custom-dev-env.box

# Vagrantfile.pkg example
Vagrant.configure("2") do |config|
  config.vm.base_mac = "080027D14C66"
  config.ssh.username = "vagrant"
  config.ssh.password = "vagrant"
end

# Add custom box to local repository
vagrant box add custom-dev-env custom-dev-env.box
Advanced Vagrant Features
Multi-Provider Support
# Vagrantfile with multiple provider configurations
Vagrant.configure("2") do |config|
  config.vm.box = "generic/ubuntu2004"

  # VirtualBox provider
  config.vm.provider "virtualbox" do |vb|
    vb.name = "ubuntu-dev-vbox"
    vb.memory = "4096"
    vb.cpus = 2
    vb.gui = false
  end

  # Libvirt provider
  config.vm.provider "libvirt" do |lv|
    lv.memory = 4096
    lv.cpus = 2
    lv.storage_pool_name = "vagrant"
    lv.machine_virtual_size = 40
  end

  # Docker provider
  config.vm.provider "docker" do |d|
    d.image = "ubuntu:20.04"
    d.remains_running = true
    d.has_ssh = true
  end
end
Ansible Integration
# Ansible provisioning configuration
Vagrant.configure("2") do |config|
  config.vm.provision "ansible" do |ansible|
    ansible.playbook = "provisioning/site.yml"
    ansible.inventory_path = "provisioning/inventory"
    ansible.limit = "all"
    ansible.extra_vars = {
      ansible_ssh_user: 'vagrant',
      ansible_ssh_private_key_file: "~/.vagrant.d/insecure_private_key"
    }
    ansible.groups = {
      "webservers" => ["web[1:2]"],
      "dbservers" => ["db"],
      "monitoring" => ["monitor"],
      "all_groups:children" => ["webservers", "dbservers", "monitoring"]
    }
  end
end
File Synchronization Options
# Various sync folder configurations
Vagrant.configure("2") do |config|
  # NFS sync (fast, requires NFS server)
  config.vm.synced_folder ".", "/vagrant",
    type: "nfs",
    nfs_udp: false,
    nfs_version: 4

  # rsync (one-way sync)
  config.vm.synced_folder "src/", "/home/vagrant/src",
    type: "rsync",
    rsync__exclude: [".git/", "node_modules/", "*.tmp"],
    rsync__auto: true

  # SMB sync (Windows hosts)
  config.vm.synced_folder ".", "/vagrant",
    type: "smb",
    smb_username: ENV['USER'],
    smb_password: ENV['PASS']
end
Performance Optimization and Troubleshooting
Performance Tuning
# Performance-optimized Vagrantfile
Vagrant.configure("2") do |config|
  config.vm.provider "libvirt" do |libvirt|
    # CPU optimization
    libvirt.cpus = 4
    libvirt.cpu_mode = "host-passthrough"
    libvirt.nested = true

    # Memory optimization
    libvirt.memory = 8192
    libvirt.memorybacking :hugepages, :size => "2048", :unit => "KiB"

    # Storage optimization
    libvirt.storage_pool_name = "fast-nvme-pool"
    libvirt.machine_virtual_size = 100
    libvirt.disk_bus = "virtio"
    libvirt.nic_model_type = "virtio"

    # Graphics optimization (disable for headless)
    libvirt.graphics_type = "none"

    # NUMA optimization
    libvirt.numa_nodes = [
      {:cpus => "0-1", :memory => "4096"},
      {:cpus => "2-3", :memory => "4096"}
    ]
  end
end
Common Troubleshooting
# Debug Vagrant issues
export VAGRANT_LOG=debug
vagrant up

# Check libvirt status
systemctl status libvirtd
virsh list --all

# Network troubleshooting
virsh net-list --all
virsh net-info default

# Storage pool issues
virsh pool-list --all
virsh pool-info vagrant

# Clean up failed VMs
vagrant destroy -f
virsh list --all
virsh undefine <vm-name> --remove-all-storage
Monitoring and Logging
Integration with DevOps Tools
Terraform Integration
CI/CD Pipeline Integration
# .github/workflows/vagrant-test.yml
name: Vagrant Environment Testing

on:
  push:
    branches: [ main, develop ]
  pull_request:
    branches: [ main ]

jobs:
  test-vagrant-environment:
    runs-on: ubuntu-latest

    steps:
    - uses: actions/checkout@v3

    - name: Setup Vagrant
      run: |
        curl -fsSL https://apt.releases.hashicorp.com/gpg | sudo apt-key add -
        sudo apt-add-repository "deb [arch=amd64] https://apt.releases.hashicorp.com $(lsb_release -cs) main"
        sudo apt-get update && sudo apt-get install vagrant

    - name: Install VirtualBox
      run: |
        sudo apt-get update
        sudo apt-get install virtualbox

    - name: Validate Vagrantfile
      run: vagrant validate

    - name: Test VM Creation
      run: |
        vagrant up
        vagrant ssh -c "echo 'VM is accessible'"
        vagrant destroy -f
Ansible Playbook Example
# provisioning/site.yml
---
- hosts: all
  become: yes
  gather_facts: yes

  pre_tasks:
    - name: Update package cache
      yum:
        update_cache: yes
      when: ansible_os_family == "RedHat"

    - name: Update package cache
      apt:
        update_cache: yes
      when: ansible_os_family == "Debian"

  roles:
    - common
    - security
    - monitoring

  post_tasks:
    - name: Verify services are running
      service:
        name: ""
        state: started
      loop:
        - sshd
        - chrony
Best Practices and Recommendations
Development Workflow Optimization
- Project Organization
- Use separate directories for different environments
- Implement consistent naming conventions
- Version control all Vagrantfiles and provisioning scripts
- Resource Management
- Monitor host system resources
- Use appropriate VM sizing for workloads
- Implement automated cleanup procedures
- Security Considerations
- Change default passwords and SSH keys
- Implement proper network isolation
- Use encrypted storage when handling sensitive data
Performance Best Practices
# Performance-optimized configuration template
Vagrant.configure("2") do |config|
  # Disable unnecessary features
  config.vm.synced_folder ".", "/vagrant", disabled: true
  config.vm.box_check_update = false

  # Optimize provider settings
  config.vm.provider "libvirt" do |libvirt|
    # Use host CPU features
    libvirt.cpu_mode = "host-passthrough"

    # Optimize memory allocation
    libvirt.memory = 8192
    libvirt.memorybacking :hugepages

    # Use fast storage
    libvirt.machine_virtual_size = 40
    libvirt.disk_bus = "virtio"
    libvirt.nic_model_type = "virtio"

    # Disable graphics for headless operation
    libvirt.graphics_type = "none"
  end

  # Minimize provisioning time
  config.vm.provision "shell",
    inline: "echo 'Fast provisioning complete'",
    run: "once"
end
Maintenance and Cleanup
# Create maintenance script
cat > /usr/local/bin/vagrant-cleanup.sh << 'EOF'
#!/bin/bash

echo "=== Vagrant Environment Cleanup ==="

# Remove unused boxes
vagrant box prune --force

# Clean up orphaned VMs
for vm in $(virsh list --name --all | grep vagrant); do
    if ! vagrant status $vm > /dev/null 2>&1; then
        echo "Removing orphaned VM: $vm"
        virsh destroy $vm 2>/dev/null
        virsh undefine $vm --remove-all-storage 2>/dev/null
    fi
done

# Clean up unused networks
for net in $(virsh net-list --name --all | grep vagrant); do
    if [ $(virsh net-info $net | grep 'Active:' | awk '{print $2}') == "no" ]; then
        echo "Removing unused network: $net"
        virsh net-undefine $net
    fi
done

# Clean up storage pools
virsh pool-refresh vagrant
echo "Cleanup completed"
EOF

chmod +x /usr/local/bin/vagrant-cleanup.sh

# Schedule weekly cleanup
echo "0 2 * * 0 root /usr/local/bin/vagrant-cleanup.sh" >> /etc/crontab
Conclusion
Vagrant represents a paradigm shift in development environment management, offering unprecedented consistency and automation for virtual machine workflows. The integration with KVM provides enterprise-grade performance while maintaining the simplicity and flexibility that makes Vagrant indispensable for modern development teams.
Key Achievements:
- Automated Environment Setup: Single-command environment deployment
- Infrastructure as Code: Version-controlled, reproducible configurations
- Cross-platform Consistency: Identical environments across different hosts
- DevOps Integration: Seamless integration with Ansible, Terraform, and CI/CD pipelines
Operational Benefits:
- Reduced Onboarding Time: New team members productive immediately
- Environment Parity: Development environments match production
- Resource Optimization: Efficient use of hardware resources
- Automated Testing: Consistent testing environments for CI/CD
Future Enhancements:
- Implement container-based development environments with Vagrant Docker provider
- Integrate with cloud providers for hybrid development workflows
- Develop custom plugins for specific organizational needs
- Explore integration with emerging virtualization technologies
Mastering Vagrant with KVM creates a solid foundation for infrastructure automation, enabling teams to focus on development rather than environment management. The combination of powerful virtualization, automated provisioning, and flexible configuration makes this stack essential for modern software development workflows.
“Vagrant transforms the traditional approach to development environments, making ‘it works on my machine’ a statement of confidence rather than an excuse.”


Comments