24 min to read
Google Chrome Extension Development and Deployment Complete Guide
From development to Chrome Web Store publication - Building browser extensions with manifest.json
Overview
This article covers the complete process of developing a Google Chrome Extension and deploying it to the Chrome Web Store.
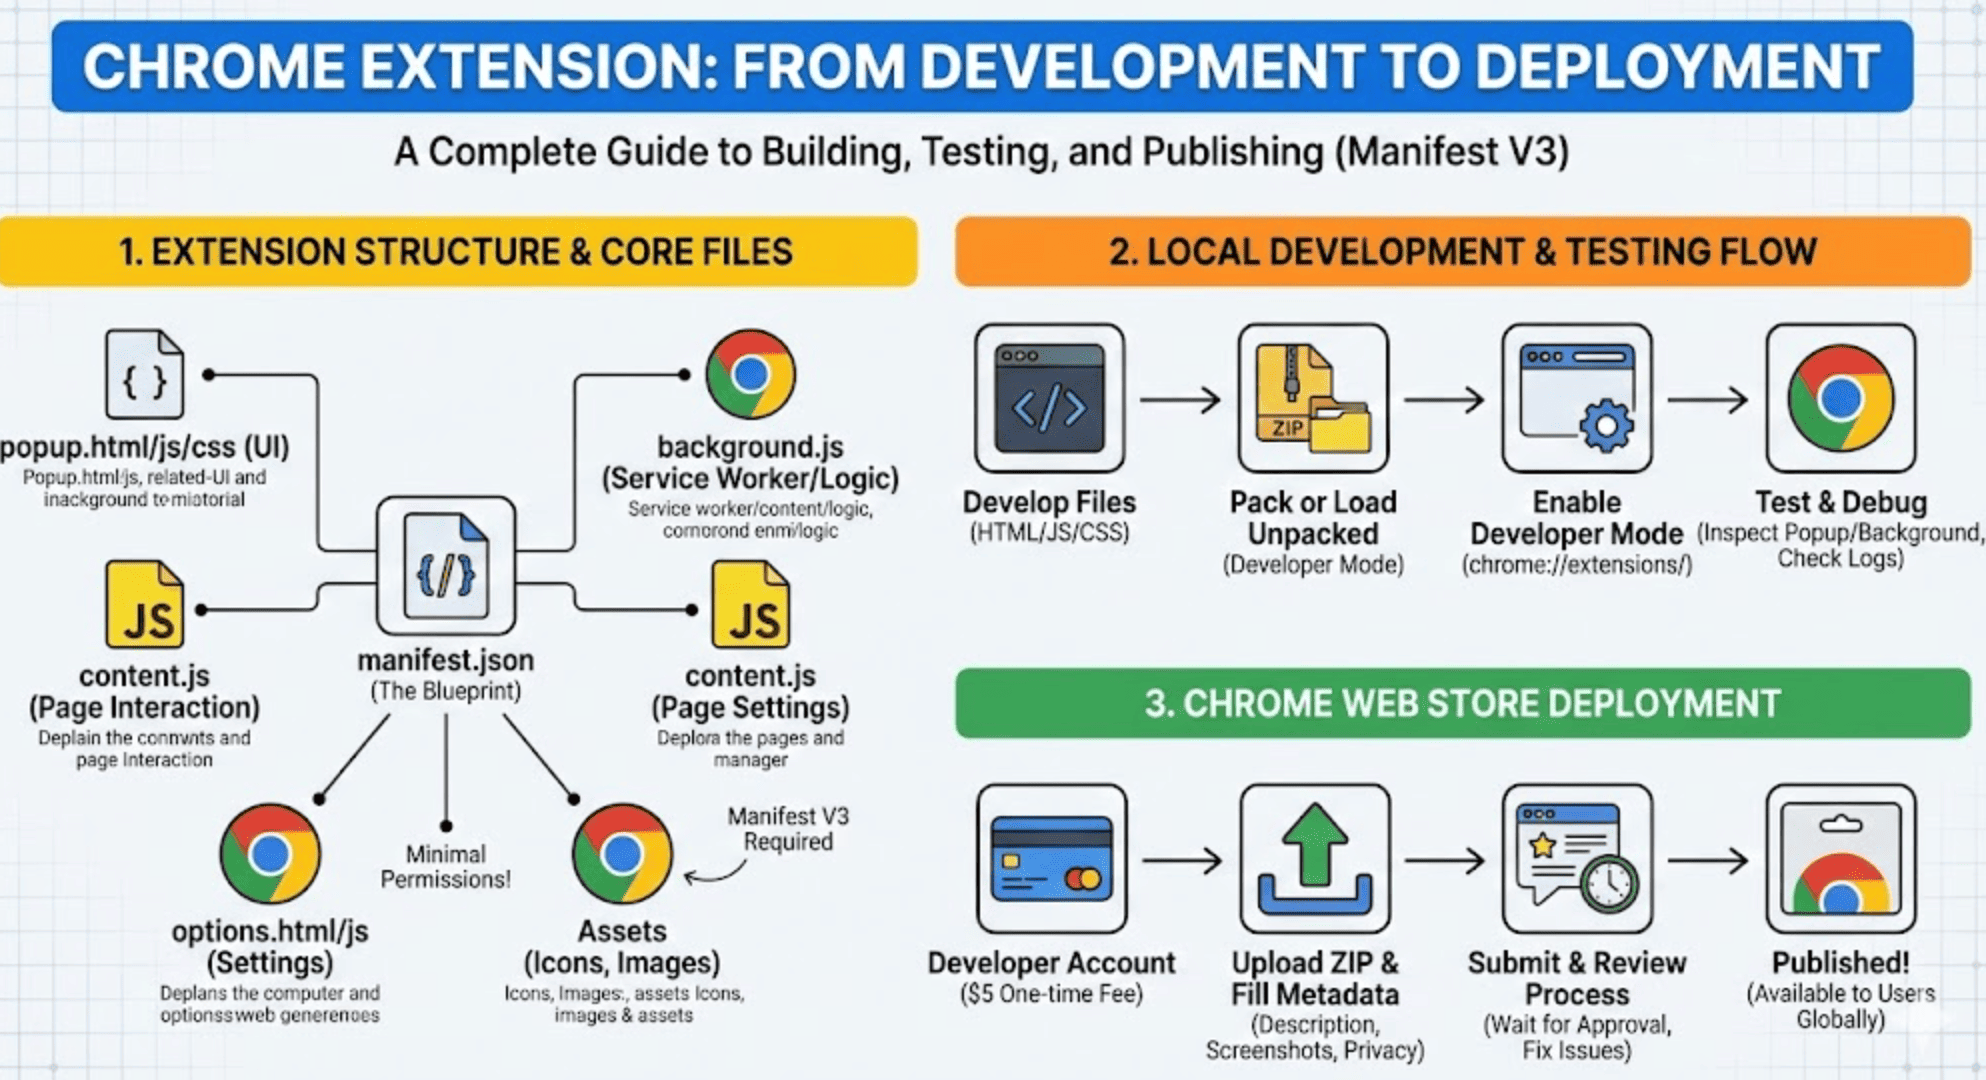
Chrome extensions are tools designed to extend browser functionality or enhance user convenience. They consist of various components centered around the manifest.json file, including popup, background scripts, content scripts, and options pages.
This guide explains the basic structure and core roles of extensions, demonstrates how to test developed extensions in a local environment, and provides detailed step-by-step procedures for registering and deploying to the Chrome Web Store.
Additionally, we’ll share two real-world examples (Dev Toolkit and QRify) I created, along with registration tips and solutions for rejection cases encountered during the review process.
What is a Google Chrome Extension?
A Google Chrome Extension is a software program designed to extend the functionality of the Chrome web browser or improve user experience. These extensions allow users to easily utilize additional features within their browser.
Key Benefits
✅ Enhanced Productivity: Automate repetitive tasks
✅ Customization: Tailor browsing experience to your needs
✅ Integration: Connect with external services and APIs
✅ Accessibility: Easy distribution via Chrome Web Store
✅ Cross-platform: Works on any OS running Chrome
Chrome Extension Architecture
Project Structure
my-extension/
│
├── manifest.json        # Configuration file (Required)
├── background.js        # Background script
├── content.js           # Content script
├── popup.html           # Popup interface
├── popup.js             # Logic for popup
├── options.html         # Options page
├── options.js           # Logic for options
├── icon.png             # Extension icon
└── styles.css           # Styles for popup or options
Core Components
1. manifest.json
The manifest.json file is the heart of every Chrome extension—it defines metadata and behavior.
{
  "manifest_version": 3,
  "name": "My Chrome Extension",
  "version": "1.0",
  "description": "A sample extension to demonstrate key concepts",
  "permissions": ["storage", "activeTab"],
  "action": {
    "default_popup": "popup.html",
    "default_icon": {
      "16": "icons/icon16.png",
      "48": "icons/icon48.png",
      "128": "icons/icon128.png"
    }
  },
  "background": {
    "service_worker": "background.js"
  },
  "content_scripts": [
    {
      "matches": ["https://*.example.com/*"],
      "js": ["content.js"],
      "css": ["content.css"]
    }
  ],
  "options_page": "options.html",
  "icons": {
    "16": "icons/icon16.png",
    "48": "icons/icon48.png",
    "128": "icons/icon128.png"
  }
}
Key Fields Explained
| Field | Description | Required |
|---|---|---|
manifest_version |
API version (use 3 for new extensions) | ✅ Yes |
name |
Extension name shown in Chrome Web Store | ✅ Yes |
version |
Version number (e.g., “1.0.0”) | ✅ Yes |
description |
Brief description of functionality | ✅ Yes |
permissions |
API permissions needed | ❌ No |
action |
Defines toolbar button and popup | ❌ No |
background |
Background service worker | ❌ No |
content_scripts |
Scripts injected into web pages | ❌ No |
icons |
Extension icons at various sizes | ✅ Yes |
2. Background Scripts
Background scripts (typically background.js) handle long-running operations, event management, and logic that runs independently of any webpage.
Manifest V3 uses Service Workers:
// background.js

// Listen for extension installation
chrome.runtime.onInstalled.addListener((details) => {
  if (details.reason === 'install') {
    console.log('Extension installed!');
    // Set default settings
    chrome.storage.sync.set({
      theme: 'light',
      notifications: true
    });
  } else if (details.reason === 'update') {
    console.log('Extension updated to version', chrome.runtime.getManifest().version);
  }
});

// Listen for messages from popup or content scripts
chrome.runtime.onMessage.addListener((request, sender, sendResponse) => {
  if (request.action === 'getData') {
    // Fetch data from storage
    chrome.storage.sync.get(['data'], (result) => {
      sendResponse({ data: result.data });
    });
    return true; // Keep message channel open for async response
  }
});

// Listen for tab updates
chrome.tabs.onUpdated.addListener((tabId, changeInfo, tab) => {
  if (changeInfo.status === 'complete' && tab.url) {
    console.log('Tab loaded:', tab.url);
    // Perform actions after page load
  }
});
3. Content Scripts
Content scripts (content.js) run in the context of web pages and can directly interact with the page’s DOM.
// content.js

// Change background color of all paragraphs
document.querySelectorAll('p').forEach(paragraph => {
  paragraph.style.backgroundColor = '#ffffe0';
});

// Add custom button to page
const button = document.createElement('button');
button.textContent = 'Click Me!';
button.style.cssText = 'position: fixed; top: 10px; right: 10px; z-index: 9999;';
button.addEventListener('click', () => {
  alert('Button clicked from content script!');
});
document.body.appendChild(button);

// Listen for messages from background or popup
chrome.runtime.onMessage.addListener((request, sender, sendResponse) => {
  if (request.action === 'highlight') {
    document.querySelectorAll(request.selector).forEach(el => {
      el.style.backgroundColor = 'yellow';
    });
    sendResponse({ status: 'highlighted' });
  }
});
4. Popup HTML
The popup (popup.html + popup.js) provides the UI shown when users click the extension icon.
popup.html:
<!DOCTYPE html>
<html>
<head>
  <meta charset="UTF-8">
  <title>My Extension Popup</title>
  <link rel="stylesheet" href="popup.css">
</head>
<body>
  <div class="container">
    <h1>Extension Popup</h1>
    <button id="actionButton">Perform Action</button>
    <div id="result"></div>
  </div>
  <script src="popup.js"></script>
</body>
</html>
popup.js:
// popup.js

document.getElementById('actionButton').addEventListener('click', async () => {
  const resultDiv = document.getElementById('result');

  // Get active tab
  const [tab] = await chrome.tabs.query({ active: true, currentWindow: true });

  // Send message to content script
  chrome.tabs.sendMessage(tab.id, {
    action: 'highlight',
    selector: 'p'
  }, (response) => {
    if (response) {
      resultDiv.textContent = `Status: ${response.status}`;
    }
  });
});

// Load saved data
chrome.storage.sync.get(['theme'], (result) => {
  if (result.theme === 'dark') {
    document.body.classList.add('dark-theme');
  }
});
5. Options Page
Options pages (options.html + options.js) let users configure extension settings.
options.html:
<!DOCTYPE html>
<html>
<head>
  <meta charset="UTF-8">
  <title>Extension Options</title>
  <link rel="stylesheet" href="options.css">
</head>
<body>
  <h1>Settings</h1>

  <label>
    <input type="checkbox" id="notifications"> Enable Notifications
  </label>

  <label>
    Theme:
    <select id="theme">
      <option value="light">Light</option>
      <option value="dark">Dark</option>
    </select>
  </label>

  <button id="save">Save Settings</button>
  <div id="status"></div>

  <script src="options.js"></script>
</body>
</html>
options.js:
// options.js

// Load saved settings
document.addEventListener('DOMContentLoaded', () => {
  chrome.storage.sync.get(['notifications', 'theme'], (result) => {
    document.getElementById('notifications').checked = result.notifications || false;
    document.getElementById('theme').value = result.theme || 'light';
  });
});

// Save settings
document.getElementById('save').addEventListener('click', () => {
  const notifications = document.getElementById('notifications').checked;
  const theme = document.getElementById('theme').value;

  chrome.storage.sync.set({ notifications, theme }, () => {
    const status = document.getElementById('status');
    status.textContent = 'Settings saved!';
    setTimeout(() => { status.textContent = ''; }, 2000);
  });
});
Real-World Examples
I developed two Chrome extensions as practical examples:
Example 1: Dev Toolkit
Purpose: Developer utility for formatting and encoding/decoding various data formats
GitHub: dev-toolkit-google-extension
Features:
- JSON Formatter with syntax highlighting
- Base64 Encoder/Decoder
- JWT Token Decoder
- URL Encoder/Decoder
- Timestamp Converter
Key Implementation:
// JSON Formatter
function formatJSON(input) {
  try {
    const parsed = JSON.parse(input);
    return JSON.stringify(parsed, null, 2);
  } catch (error) {
    return `Invalid JSON: ${error.message}`;
  }
}

// Base64 Encoder
function encodeBase64(input) {
  return btoa(unescape(encodeURIComponent(input)));
}

// JWT Decoder
function decodeJWT(token) {
  const parts = token.split('.');
  if (parts.length !== 3) {
    throw new Error('Invalid JWT format');
  }

  const payload = JSON.parse(atob(parts[1]));
  return JSON.stringify(payload, null, 2);
}
Example 2: QRify
Purpose: Simple QR code generator for current page URL
GitHub: qrify-google-extension
Features:
- Generate QR code for active tab URL
- Customizable QR code size
- Download QR code as image
- Copy QR code to clipboard
Key Implementation:
// popup.js
async function generateQRCode() {
  const [tab] = await chrome.tabs.query({ active: true, currentWindow: true });
  const url = tab.url;

  // Use QR Code library (loaded via CDN)
  const qr = qrcode(0, 'M');
  qr.addData(url);
  qr.make();

  // Display QR code
  document.getElementById('qrcode').innerHTML = qr.createImgTag(5);
}

document.addEventListener('DOMContentLoaded', generateQRCode);
Local Development and Testing
Step 1: Enable Developer Mode
- Navigate to
chrome://extensions/ - Toggle Developer mode (top-right corner)
- New buttons will appear: “Load unpacked”, “Pack extension”, “Update”
Step 2: Load Unpacked Extension
- Click “Load unpacked”
- Select your extension directory (containing manifest.json)
- Extension appears in the list with temporary ID
Step 3: Test Extension
# After loading unpacked:
1. Click extension icon in toolbar
2. Test popup functionality
3. Navigate to matching URLs to test content scripts
4. Check background script console:
   - Click "service worker" link under extension
   - View console logs and errors
Step 4: Iterative Development
# After making code changes:
1. Go to chrome://extensions/
2. Click "Reload" button on your extension
3. Test changes immediately
4. Check console for errors
Debugging Tips
// Add extensive logging
console.log('[Extension] Event triggered:', data);

// Use Chrome DevTools
// - Popup: Right-click popup → Inspect
// - Background: Click "service worker" → Console
// - Content Script: Regular page DevTools → Console

// Check for errors
chrome.runtime.lastError && console.error(chrome.runtime.lastError);
Chrome Web Store Deployment
Prerequisites
Important Note: South Korea is not available as a developer account country because it doesn’t allow merchant account conversion. Use a US address if needed.
Requirements:
- Google Account
- $5 one-time developer registration fee
- Extension ZIP file
- Privacy policy URL (if collecting data)
- Icons (16x16, 48x48, 128x128)
- Screenshots for store listing
Step 1: Register as Developer
- Visit Chrome Web Store Developer Dashboard
- Sign in with Google Account
- Pay $5 registration fee
- Accept developer agreement
Step 2: Prepare Extension Package
# Create ZIP file of your extension
# DO NOT include:
# - .git directory
# - node_modules
# - Development files
# - Private keys

zip -r extension.zip . -x "*.git*" -x "*node_modules*" -x "*.env*"
Step 3: Create Store Listing
Required Information:
Store Listing:
  - Short description (132 chars max)
  - Detailed description
  - Category selection
  - Language support

Visual Assets:
  - Small icon: 128x128 PNG
  - Screenshots: 1280x800 or 640x400 (at least 1)
  - Promotional images (optional)

Additional:
  - Privacy policy URL (required if using permissions)
  - Support email
  - Website URL (optional)
Step 4: Upload and Submit
- Click “New Item” in developer dashboard
- Upload ZIP file
- Fill out Store Listing:
- Product name
- Summary (short description)
- Detailed description
- Category
- Language
- Add Screenshots (at least 1, maximum 5)
- Set Pricing & Distribution:
- Regions to publish
- Visibility (Public/Unlisted/Private)
- Submit for Review
Review Process
Timeline
- Initial Review: 1-3 days typically
- Resubmission: 1-2 days
- Complex Extensions: Up to 1 week
Common Rejection Reasons
Issue 1: Excessive Permissions
Rejection Message:
Your extension requests permissions that are not required for its functionality.
Solution:
Remove unnecessary permissions from manifest.json:
{
  "permissions": [
    "activeTab"  // ❌ Remove if not actively using
  ]
}
Only request permissions you actively use:
{
  "permissions": [
    "storage"  // ✅ Only if storing data
  ]
}
Issue 2: Missing Privacy Policy
Rejection Message:
Extensions that handle user data must provide a privacy policy.
Solution: Create and link a privacy policy:
# Privacy Policy for [Extension Name]

## Data Collection
This extension does not collect any personal information.

## Data Storage
Settings are stored locally using Chrome's storage API.

## Third-Party Services
This extension does not use any third-party services.

## Contact
Email: your-email@example.com
Host on GitHub Pages or your website, then add URL to store listing.
Issue 3: Poor Description
Rejection Message:
Store listing must clearly describe extension functionality.
Solution: Write clear, detailed description:
❌ Bad: "Useful tool for developers"

✅ Good:
"Dev Toolkit provides essential utilities for web developers:
- Format and validate JSON
- Encode/decode Base64
- Parse JWT tokens
- Convert timestamps
- Encode/decode URLs

Perfect for debugging APIs, analyzing tokens, and working with encoded data."
Issue 4: Misleading Screenshots
Rejection Message:
Screenshots must accurately represent extension functionality.
Solution:
- Use actual extension UI in screenshots
- Show real functionality, not mockups
- Annotate features if helpful
- Minimum 1280x800 resolution
Published Extensions
After approval, extensions are publicly available:
Dev Toolkit
Chrome Web Store: Dev Toolkit
Features:
- JSON Formatter
- Base64 Encoder/Decoder
- JWT Decoder
- URL Encoder/Decoder
QRify
Chrome Web Store: QRify
Features:
- Generate QR codes for URLs
- Customizable size
- Download as image
Advanced Topics
Manifest V3 Best Practices
{
  "manifest_version": 3,
  "permissions": [
    "storage"  // Minimum permissions only
  ],
  "host_permissions": [
    "https://api.example.com/*"  // Specific domains only
  ],
  "background": {
    "service_worker": "background.js",
    "type": "module"  // Use ES modules
  }
}
Storage API Usage
// Save data
chrome.storage.sync.set({ key: 'value' }, () => {
  console.log('Data saved');
});

// Load data
chrome.storage.sync.get(['key'], (result) => {
  console.log('Data loaded:', result.key);
});

// Listen for changes
chrome.storage.onChanged.addListener((changes, area) => {
  console.log('Storage changed:', changes);
});
Messaging Between Components
// From popup to background
chrome.runtime.sendMessage({ action: 'getData' }, (response) => {
  console.log('Response:', response);
});

// From background to content script
chrome.tabs.query({ active: true }, (tabs) => {
  chrome.tabs.sendMessage(tabs[0].id, { action: 'highlight' });
});

// Listen in background
chrome.runtime.onMessage.addListener((request, sender, sendResponse) => {
  if (request.action === 'getData') {
    sendResponse({ data: 'example' });
  }
  return true; // Keep channel open for async
});
OAuth Integration
// Using chrome.identity API
chrome.identity.getAuthToken({ interactive: true }, (token) => {
  if (chrome.runtime.lastError) {
    console.error(chrome.runtime.lastError);
    return;
  }

  // Use token to call API
  fetch('https://api.example.com/data', {
    headers: { 'Authorization': `Bearer ${token}` }
  });
});
Troubleshooting
Issue: Extension Not Loading
Symptoms: Error when loading unpacked extension
Solutions:
# Check manifest.json syntax
cat manifest.json | jq .

# Verify required fields exist
- manifest_version
- name
- version

# Check file paths match manifest
ls popup.html background.js content.js
Issue: Content Script Not Running
Symptoms: Content script code doesn’t execute
Solutions:
// Check matches pattern in manifest.json
"content_scripts": [{
  "matches": ["https://*.example.com/*"],  // Verify pattern
  "js": ["content.js"]
}]

// Add logging to verify script loads
console.log('[Content Script] Loaded');

// Check CSP policies on target site
// Some sites block extension scripts
Issue: Popup Not Showing
Symptoms: Clicking icon does nothing
Solutions:
// Verify popup path in manifest
"action": {
  "default_popup": "popup.html"  // Check path is correct
}

// Check popup HTML loads
// Right-click extension icon → Inspect popup

// Verify no JavaScript errors
// Check console in popup DevTools
Monetization Considerations
Important: South Korea does not support merchant accounts on Chrome Web Store.
Alternative Approaches
- Free Extensions with Donations:
<!-- Add donation link in options page --> <a href="https://buymeacoffee.com/yourname">Support Development</a> - Premium Features via External Service:
- Free basic features
- Premium features require external subscription
- Enterprise Licensing:
- Contact businesses directly
- License outside Chrome Web Store
Conclusion
Chrome Extensions are excellent projects that can be developed with simple HTML, JS, and CSS without complex frameworks—making them accessible to anyone.
Key Benefits
✅ Automate repetitive tasks in daily workflow
✅ Extend website functionality with custom features
✅ Share personal tools via browser integration
✅ Global distribution with one-time $5 fee
✅ AI-assisted development makes it beginner-friendly
Limitations to Note
⚠️ No Korean merchant accounts: Cannot monetize directly
⚠️ Review process: Can take several days
⚠️ Permission scrutiny: Only request what you need
⚠️ Manifest V3: Must follow latest standards
Future Enhancements
Consider exploring these advanced features:
- Offline storage with IndexedDB
- OAuth integration for third-party services
- Cross-extension messaging for modular architecture
- WebAssembly for performance-critical tasks
- Internationalization (i18n) for multi-language support
With AI tools, even non-developers can create useful Chrome extensions. If you have an idea, give it a try!

Comments