12 min to read
Understanding Kubernetes Components and Pod Creation
A comprehensive guide to Kubernetes architecture and its core components
Overview
Let’s explore Kubernetes components and understand how pods are created within a cluster.
Kubernetes (K8s) is an open-source platform designed to automate deploying, scaling, and operating application containers. It groups containers that make up an application into logical units for easy management and discovery. With Kubernetes, you can build container-based applications that can run anywhere, whether on public, private, or hybrid clouds.
💡 Why Kubernetes?
Kubernetes offers several key benefits:
- Container Orchestration
- Scalability
- Load Balancing
- High Availability
- Automated Rollouts and Rollbacks
- Service Discovery
- Storage Orchestration
- 🔐 Secret and Configuration Management
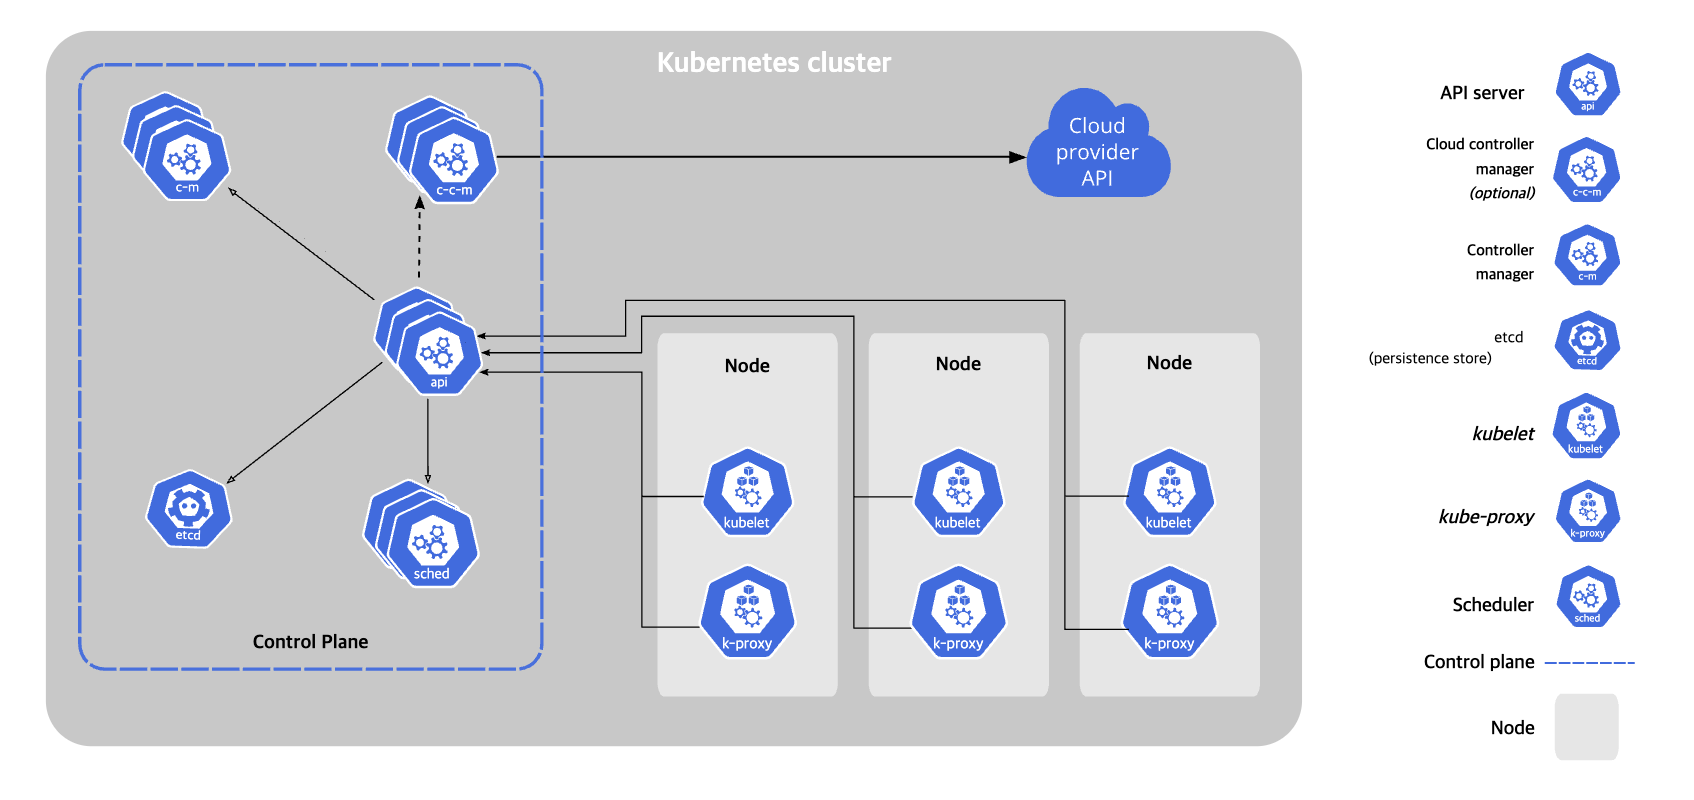
Kubernetes Architecture
Kubernetes follows a master-worker architecture (also known as control plane and data plane). This distributed architecture ensures high availability and scalability for container orchestration.
A Kubernetes cluster consists of at least one control plane node and multiple worker nodes. Each node runs specific components that together form the Kubernetes system.
- Control Plane NodeManages the worker nodes and the Pods in the cluster. In production environments, the control plane typically runs across multiple computers for high availability.
- Worker NodesHost the running applications as containers within Pods. They communicate with the control plane and receive instructions on which containers to run.
Kubernetes Components
The Kubernetes system is composed of several components that work together to provide container orchestration. These components can be divided into two main groups: Control Plane Components and Node Components.
Control Plane Components
Control plane components make global decisions about the cluster (such as scheduling), as well as detecting and responding to cluster events. These components can run on any machine in the cluster, but typically they run on dedicated machines that are not configured to run user containers.
kube-apiserver
The API server is the front end for the Kubernetes control plane, exposing the Kubernetes API. It’s designed to scale horizontally by deploying more instances.
etcd
Consistent and highly-available key-value store used as Kubernetes’ backing store for all cluster data. Always have a backup plan for etcd data.
kube-scheduler
Watches for newly created Pods with no assigned node, and selects a node for them to run on based on resource requirements, constraints, and other factors.
kube-controller-manager
Runs controller processes that regulate the state of the cluster. Each controller is a separate process, but they are compiled into a single binary and run in a single process to reduce complexity.
Controller Types
- Node Controller: Responsible for noticing and responding when nodes go down
- Job Controller: Watches for Job objects that represent one-off tasks, then creates Pods to run those tasks
- Endpoints Controller: Populates the Endpoints object (joins Services & Pods)
- Service Account & Token Controllers: Create default accounts and API access tokens for new namespaces
- Replication Controller: Responsible for maintaining the correct number of pods for every replication controller object in the system
cloud-controller-manager
Embeds cloud-specific control logic. It lets you link your cluster to your cloud provider’s API and separates the components that interact with the cloud platform from components that only interact with your cluster.
Node Components
Node components run on every node, maintaining running pods and providing the Kubernetes runtime environment.
kubelet
An agent that runs on each node in the cluster. It ensures that containers are running in a Pod as expected according to the PodSpecs. The kubelet takes a set of PodSpecs provided through various mechanisms and ensures that the containers described in those PodSpecs are running and healthy.
kube-proxy
A network proxy that runs on each node, implementing part of the Kubernetes Service concept. It maintains network rules that allow network communication to your Pods from network sessions inside or outside of your cluster.
Container Runtime
The software responsible for running containers. Kubernetes supports several container runtimes: Docker, containerd, CRI-O, and any implementation of the Kubernetes CRI (Container Runtime Interface).
Additional Components
Beyond the core components, Kubernetes includes several additional components that enhance its functionality:
DNS
Cluster DNS is a DNS server that provides DNS records for Kubernetes services. Containers started by Kubernetes automatically include this DNS server in their DNS searches.
Dashboard
A general-purpose, web-based UI for Kubernetes clusters. It allows users to manage and troubleshoot applications running in the cluster as well as the cluster itself.
Ingress Controllers
Manages external access to the services in a cluster, typically HTTP/HTTPS. Ingress can provide load balancing, SSL termination, and name-based virtual hosting.
Container Resource Monitoring
Records generic time-series metrics about containers in a central database and provides a UI for browsing that data.
Cluster-level Logging
Responsible for saving container logs to a central log store with search/browsing interface.
Pod Creation Process
A Pod is the smallest deployable unit in Kubernetes, consisting of one or more containers that share storage and network resources. Understanding how Pods are created helps grasp the internal workings of Kubernetes.
User initiates deployment
kubectl apply -f k8s-deployment.yml
Detailed Pod Creation Flow
When a user submits a request to create a Pod (or a controller like Deployment, which creates Pods), the request is sent to the API server. The API server authenticates the request, validates it, and persists it to etcd.
Step 2: Controller Processing
If the request is for a controller resource (like Deployment), the appropriate controller will observe this new resource and create Pod objects that match the requested specifications.
Step 3: Scheduling
The scheduler watches for newly created Pods that have no node assigned. It selects an optimal node for the Pod based on resource requirements, hardware/software/policy constraints, affinity/anti-affinity specifications, and data locality.
Step 4: kubelet Pod Creation
The kubelet on the selected node sees that the Pod has been scheduled to its node and begins the Pod creation process. It communicates with the container runtime to start the containers defined in the Pod spec.
Step 5: Container Creation
The container runtime (e.g., containerd, Docker) creates the containers as specified. This includes pulling images if they aren't already present on the node.
Step 6: Status Updates
The kubelet updates the Pod status via the API server, which then stores the updated status in etcd. This continues as the Pod's state changes throughout its lifecycle.
Process Flow Diagram
Explanation of the Mermaid Diagram
- Client → API Server: Initiates the Pod creation request.
- API Server → etcd: Stores the object definition.
- API Server → etcd: Updates etcd with POD resource information.
- API Server → Controller Manager: Determines where to create the Pod and updates the state.
- Controller Manager → Scheduler: Scheduler retrieves the template for Pod scheduling.
- Scheduler → Kubelet → Container Runtime: Kubelet commands the Container Runtime to create the container.
- Controller Manager → etcd: Updates the final state in etcd.
This flow closely mirrors the Kubernetes pod creation lifecycle.
Pod Lifecycle
Pods in Kubernetes go through various phases during their lifetime. Understanding these phases is crucial for troubleshooting and optimization.
Pod Phases
Running: Pod has been bound to a node, and all containers have been created. At least one container is still running or in the process of starting/restarting.
Succeeded: All containers in the Pod have terminated successfully and will not be restarted.
Failed: All containers in the Pod have terminated, and at least one container has terminated in failure (exited with non-zero status or was terminated by the system).
Unknown: The state of the Pod could not be determined, typically due to communication issues with the node hosting the Pod.
Container States
Within a Pod, containers can be in one of the following states:
- Waiting: Container is waiting to start (e.g., waiting for image to be pulled)
- Running: Container is executing without issues
- Terminated: Container completed execution or failed
Pod Conditions
In addition to phases, a running Pod has a set of conditions:
- PodScheduled: Pod has been scheduled to a node
- ContainersReady: All containers in the Pod are ready
- Initialized: All init containers have completed successfully
- Ready: Pod is serving requests and should be included in load balancing pools
Kubernetes Networking
Kubernetes has a distinctive networking model that allows Pods to communicate with each other, regardless of which node they’re running on.
Pod Networking
Every Pod in a Kubernetes cluster receives its own unique IP address. This means containers within a Pod can communicate using localhost, while containers in different Pods communicate using the Pod IP addresses.
Kubernetes Networking Rules
- Every Pod can communicate with every other Pod without NAT
- Every Node can communicate with every Pod without NAT
- A Pod’s IP address is the same regardless of which Node is viewing it
Services
Since Pods are ephemeral and their IP addresses can change, Kubernetes provides Services as a way to expose applications running in Pods with a stable endpoint.
Types of Services:
- ClusterIP: Exposes the Service on an internal IP in the cluster
- NodePort: Exposes the Service on each Node’s IP at a static port
- LoadBalancer: Exposes the Service externally using a cloud provider’s load balancer
- ExternalName: Maps the Service to the contents of the externalName field (e.g., foo.bar.example.com)
Example Service YAML
apiVersion: v1
kind: Service
metadata:
  name: my-service
spec:
  selector:
    app: MyApp
  ports:
    - port: 80
      targetPort: 9376
  type: ClusterIP
Practical Example: Deploying a Web Application
Let’s look at a practical example of deploying a simple web application in Kubernetes. This involves creating a Deployment and a Service.
Deployment YAML
apiVersion: apps/v1
kind: Deployment
metadata:
  name: web-app
spec:
  replicas: 3
  selector:
    matchLabels:
      app: web-app
  template:
    metadata:
      labels:
        app: web-app
    spec:
      containers:
      - name: web-app
        image: nginx:latest
        ports:
        - containerPort: 80
        resources:
          limits:
            cpu: "0.5"
            memory: "512Mi"
          requests:
            cpu: "0.2"
            memory: "256Mi"
Service YAML
apiVersion: v1
kind: Service
metadata:
  name: web-app-service
spec:
  selector:
    app: web-app
  ports:
  - port: 80
    targetPort: 80
  type: ClusterIP
Applying the Configuration
# Create the Deployment
kubectl apply -f deployment.yaml

# Create the Service
kubectl apply -f service.yaml

# Verify the Deployment and Pods
kubectl get deployments
kubectl get pods

# Verify the Service
kubectl get services

# Access the application (port forwarding for local testing)
kubectl port-forward service/web-app-service 8080:80
Troubleshooting Kubernetes Issues
When working with Kubernetes, various issues can arise. Here are some common troubleshooting techniques:
Pod Issues
- Check Pod Status:
kubectl get pods - Pod Details:
kubectl describe pod <pod-name> - Pod Logs:
kubectl logs <pod-name> - Previous Container Logs:
kubectl logs <pod-name> --previous
Node Issues
- Node Status:
kubectl get nodes - Node Details:
kubectl describe node <node-name> - Node Resource Usage:
kubectl top node
Networking Issues
- Service Details:
kubectl describe service <service-name> - Network Policies:
kubectl get networkpolicies - DNS Troubleshooting: Deploy a debug container and use tools like
nslookupanddig

Comments