5 min to read
Docker Layers - A Deep Dive into Dockerfile Build Principles
Exploring Docker image layers and build optimization techniques
Overview
Following our previous discussion about Dockerfiles, today we’ll explore Docker layers and build principles in depth. Understanding these concepts is crucial for creating efficient and maintainable Docker images.
Dockerfile Build Principles
Dockerfile is a script that contains a series of instructions on how to build a Docker image.
Docker images consist of a series of layers, each of which represents Dockerfile’s instructions.
Understanding the building principle and layers is important in creating an efficient and easy-to-manage Docker image.
1. Base Image
Every Dockerfile starts with a base image specified using the FROM instruction:
FROM ubuntu:latest
2. Instructions
Dockerfile contains several key instructions:
RUN: Execute commands in shellCOPY/ADD: Copy files from host to imageWORKDIR: Set working directoryENV: Set environment variablesEXPOSE: Inform Docker about network portsCMD/ENTRYPOINT: Specify container startup commands
3. Layers
Each instruction creates a new layer in the Docker image.
4. Caching
Docker optimizes builds by caching unchanged layers.
5. Final Image
The result is a cumulative stack of all layers.
Understanding Docker Layers
Docker images consist of read-only layers, each representing a Dockerfile instruction. Here’s how they work:
Layer Operation
1. Base Layer
- Created by the
FROMinstruction - Contains OS or runtime environment
2. Additional Layers
- Created by filesystem-modifying instructions
Example Dockerfile:
3. Layer Storage
- Each layer is stored separately
- Only new layers are downloaded during pulls
Benefits of Layers
1. Reusability
- Layers can be shared across images
- Saves disk space
- Improves download speed
2. Efficiency
- Cached layers are reused
- Faster build times
3. Immutability
- Layers are read-only
- Ensures consistency
Visualizing Docker Layers
To better understand layers in your Docker images, you can use the docker history command:
docker history my-image:latest
Example output:
IMAGE          CREATED       CREATED BY                                      SIZE      COMMENT
abc123def456   2 hours ago   /bin/sh -c #(nop) CMD ["python3" "app.py"]      0B
ghijkl789101   2 hours ago   /bin/sh -c pip3 install -r requirements.txt     15.8MB
mnopqr112131   2 hours ago   /bin/sh -c #(nop) WORKDIR /app                  0B
stuvwx141516   2 hours ago   /bin/sh -c #(nop) COPY . /app                   1.5MB
yz1718192021   2 hours ago   /bin/sh -c apt-get update && apt-get install…   180MB
base22232425   5 days ago    /bin/sh -c #(nop) CMD ["bash"]                  0B
<missing>      5 days ago    /bin/sh -c #(nop) ADD file:4f15d7…              75.2MB
For a more detailed view, you can use external tools like dive:
# Install dive
wget https://github.com/wagoodman/dive/releases/download/v0.9.2/dive_0.9.2_linux_amd64.deb
sudo apt install ./dive_0.9.2_linux_amd64.deb

# Analyze image layers
dive my-image:latest
Layer Caching
Caching is a key feature of Docker layers:
Understanding Cache Invalidation
Cache is invalidated when:
- The content of copied files changes
- The instruction itself changes
- Earlier layers that subsequent layers depend on change
Advanced Caching Strategies
1. Using BuildKit’s Mount Cache
BuildKit (available in Docker 18.09+) offers more advanced caching:
To enable BuildKit:
# Linux/macOS
export DOCKER_BUILDKIT=1

# Windows PowerShell
$env:DOCKER_BUILDKIT=1
2. Using .dockerignore
Create a proper .dockerignore file to exclude unnecessary files:
# Example .dockerignore
node_modules
npm-debug.log
Dockerfile
.dockerignore
.git
.gitignore
README.md
tests
coverage
.env
Examples
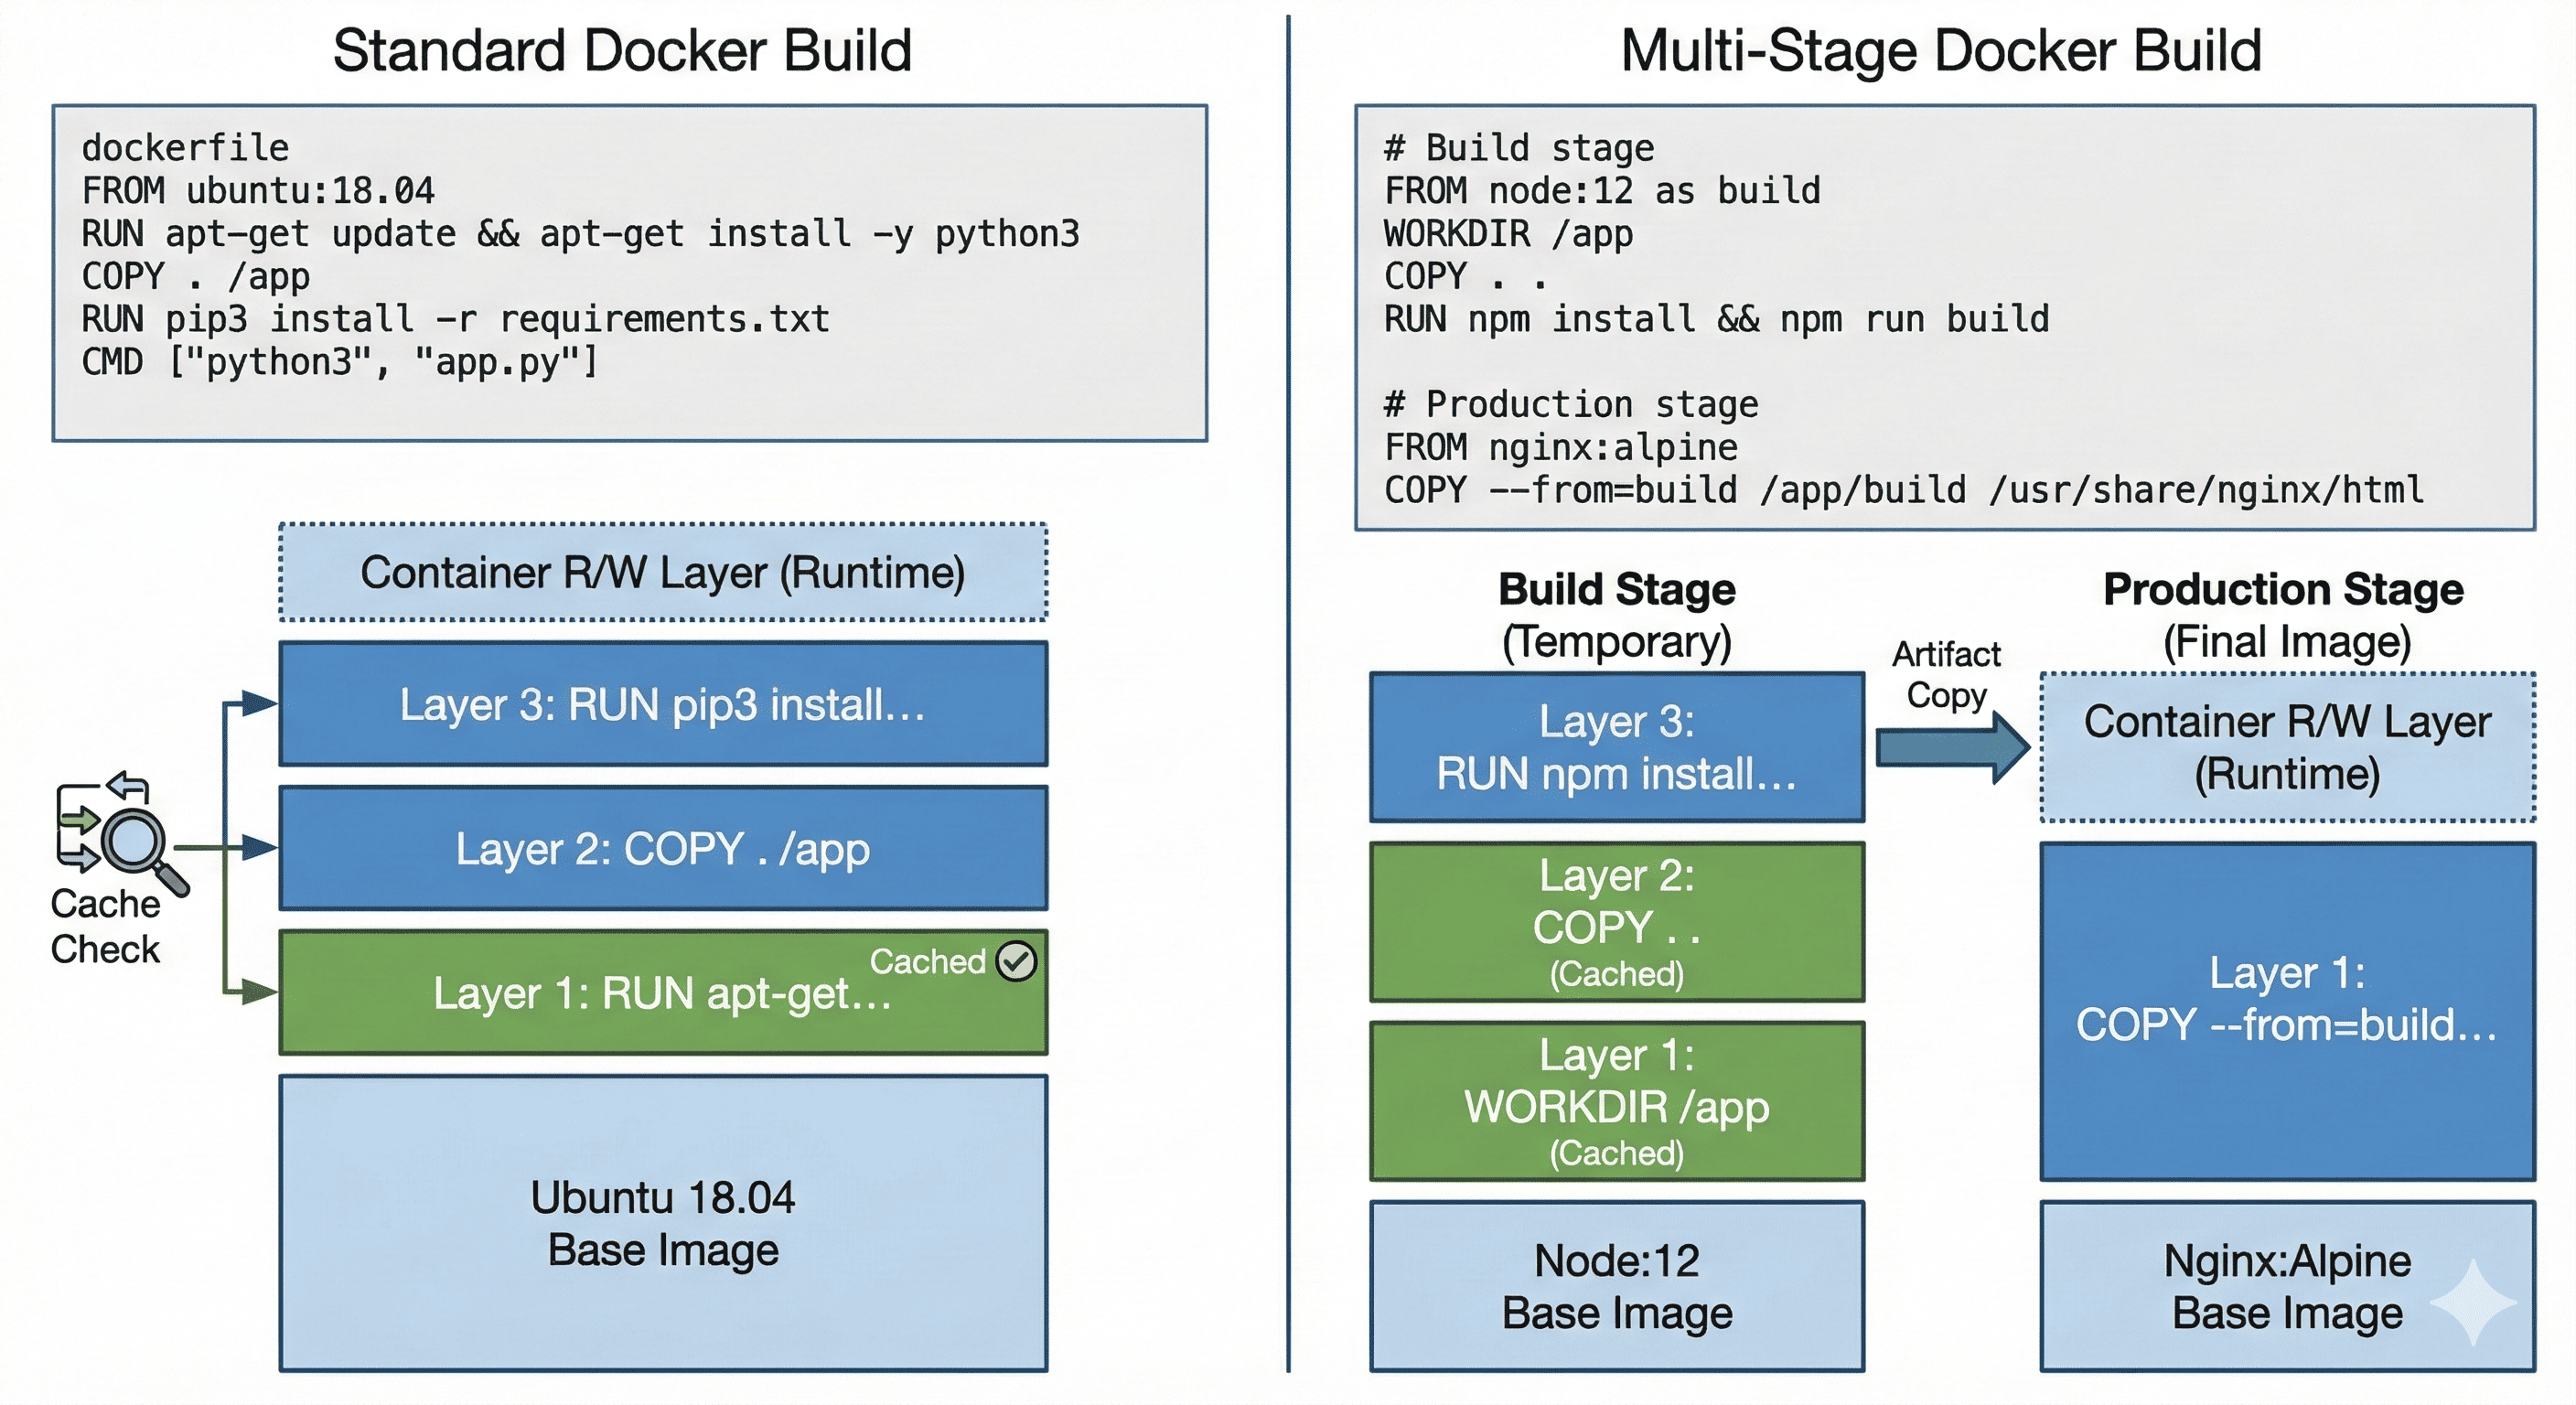
1. Standard Dockerfile
Layer breakdown:
- Ubuntu base image
- Python installation
- Application code
- Dependencies
- Command configuration
2. Multi-Stage Build
Benefits:
- Smaller final image
- Separation of build and runtime environments
- Better security
Layer Optimization Techniques
Minimizing Image Size:
1. Combine RUN Instructions: Reduce the number of layers by combining RUN commands. Use ‘&&’ to chain commands and ‘' for line breaks to maintain readability. Clean up files in the same layer where they’re created to minimize image size.
2. Use .dockerignore: Utilize a .dockerignore file to exclude unnecessary files from your build context. This prevents large or sensitive files from being copied into your image.
3. Choose Smaller Base Images: Use alpine or slim variants when possible to reduce base image size. Consider distroless images for production environments to further minimize attack surface.
4. Remove Unnecessary Files: Delete package manager caches and temporary files. Use the –no-install-recommends option with apt-get to prevent installation of recommended packages and reduce image size.
Before Optimization:
After Optimization:
Further optimized with multi-stage build:
Real-World Examples
1. Node.js Application
2. Java Spring Boot Application
Layer Debugging and Analysis
When you encounter issues with Docker layers, these commands can help:
# View detailed layer information
docker history --no-trunc my-image:latest

# Inspect image metadata
docker inspect my-image:latest

# Check image size
docker images my-image:latest

# Compare image layers
docker diff my-container-id
For identifying the largest layers:
# Using dive tool
dive my-image:latest

# Alternative with Docker CLI
docker save my-image:latest | tar -xC /tmp
du -sh /tmp/*/layer.tar | sort -hr


Comments